Any Kitchen Will Do

Give me a kitchen and I will cook.

Archive for the category “pizza”

Pizza Reboot

pizzarebootThe other day it was warm and rainy. We were hungry and had previously talked about creating a new to us pizza crust. Since we had time and wanted to stay dry, we made an absolute mess of the kitchen and had wonderfully successful results from our experiment.

It was a great day. Our schedules have been almost opposite lately, with each of us pursuing our multiple streams of income, while juggling the fun and awe we experience watching our Little B grow and explore. It was nice to be at the same place at the same time, in the kitchen, with our daughter supervising from the nearby barstool. Throughout our dozen years of marriage, the kitchen has been a foundation where we reconnect and learn new things together. It was so nice to be back in it after running around with our heads cut off lately!

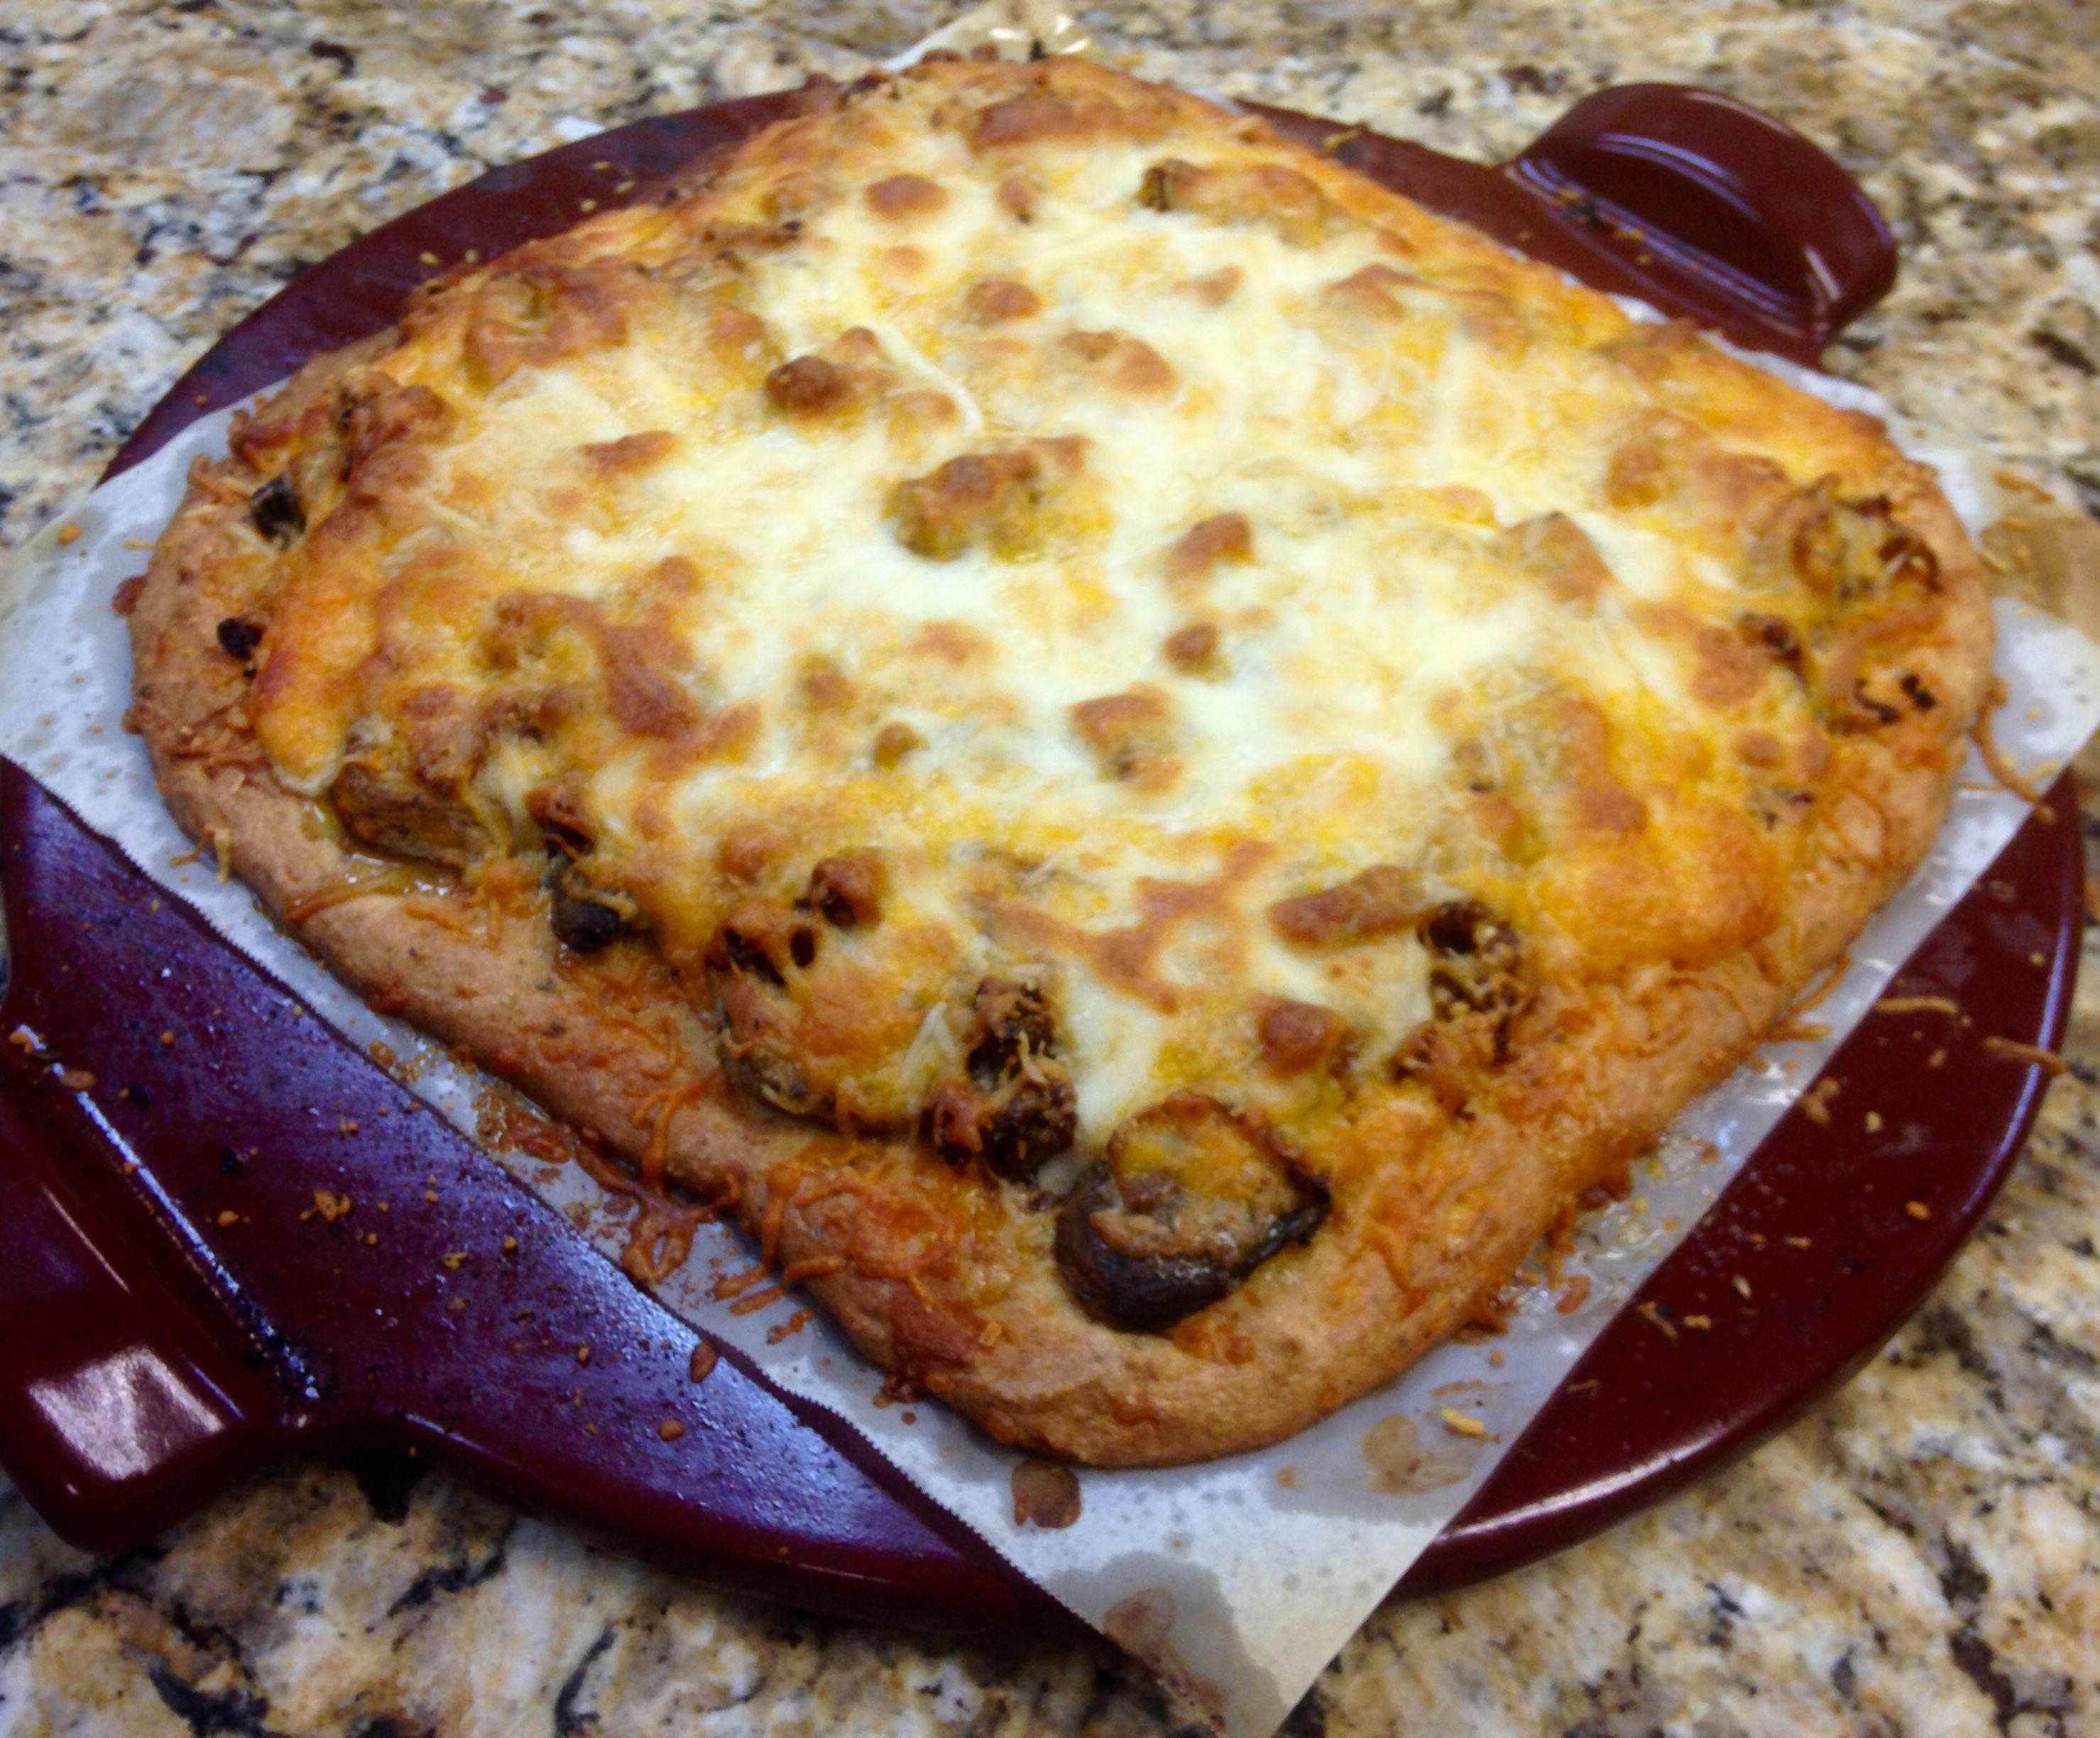
This pizza crust is the closest to a traditional, grain-based crust we have created, with the ability to pick up a piece and take a bite while still hot. Our other recipes result in slices, but to handle them with other than a fork or knife (blasphemy!!!) they have to cool significantly. With our pizza reboot here, Big D especially enjoyed the ability to almost burn his fingers and run a string of hot cheese connecting slice to mouth.

Although not pictured, we made a second pizza for Little B, testing our crust recipe against one of pizza’s greatest critics – a seven year old. She loved her go-to combination of tomato-based sauce, pepperoni and black olives. I think the fact she ate four pieces between lunch and dinner tells you something!

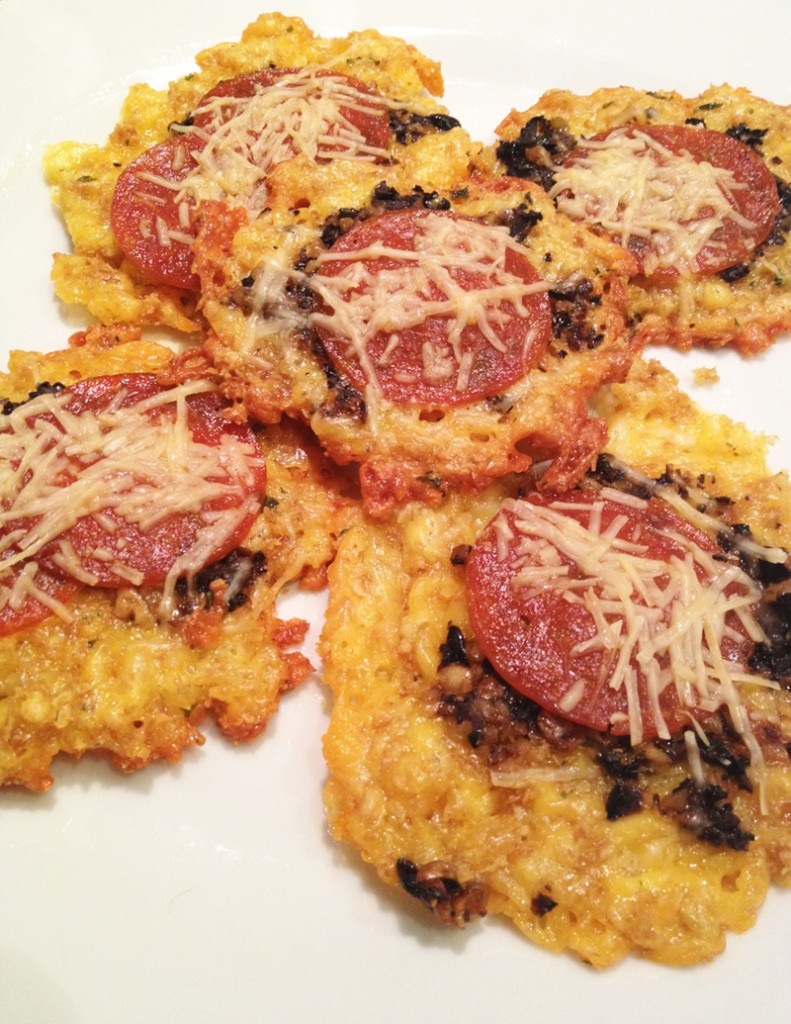
In the past we have made some good crust with an almond flour base, with a neutral flavor that allows the topping and sauce to shine. Prior to that, we made a hearty cheesy crust that was our staple for years. Other variations on the pizza theme, absent actual crusts, included a squash based pizza casserole, portabello mushroom pizzas and little, two-bite pizza pucks! Whether you have two hours or twenty minutes, grain free pizza can be yours!

As always, there is no limit to the sauce and topping combinations you can use. I list below what we did for a sweet and spicy result. Have fun with it, whether it is raining outside or not!

Pizza Reboot

1 cup extra virgin olive oil
12 large eggs (about 2 1/4 cups), whisked
1/3 cup apple cider vinegar
1/2 cup water
1 cup coconut flour
1/3 cup golden flaxseed meal
1 1/2 teaspoon sea salt
1/2 teaspoon dried basil leaves
1/2 teaspoon dried oregano leaves
1 tablespoon garlic powder (we are garlic fiends, so if you are less so reduce the amount)
1 cup finely grated cheddar and mozzarella cheeses

Suggested Toppings

1/2 cup ranch dressing
1/2 pound ground hot Italian sausage, cooked
3/4 cup caramelized onions or 1/2 cup onion paste *
1 cup sautéed mushroom slices*
Crystal hot sauce
1 cup finely grated cheddar and mozzarella cheeses
1/2 cup grated Parmesan cheese
Additional dried herbs to taste (parsley, basil, oregano, garlic…)

Preheat oven to 400 degrees. Prepare your pizza baking surface – preheat pizza stone as directed for stone, or line two shallow baking sheets with parchment paper.

NOTE: The pizza stone crusts will be smaller and thicker, while the 2 baking sheet version will result in a thinner, crispier crust.

ANOTHER NOTE: As an extra precaution we use parchment paper on our pizza stone (as you can see in the picture), but it may not be necessary. Since we have one pizza stone and make two pizzas, the paper makes it easier to remove the first pizza immediately and move on to the second.

In a mixing bowl combine oil, eggs, apple cider vinegar and water.

In a medium bowl combine the dry ingredients of coconut flour, flaxseed meal, salt, basil, oregano and garlic powder.

With the mixer on low add the dry ingredients to the wet. Increase mixer speed to medium until ingredients are well combined. Add cheese and stir until well distributed. Divide batter in half.

Pour half the batter on the preheated pizza stone or on a prepared baking sheet. Spread batter to desired thickness. Bake for 15-20 minutes, until top sets and edges begin to brown. The browning on top is a signal that the center of the bottom is cooked sufficiently to hold together when the pizza is done.

Remove crust from oven and add desired sauce and toppings. For the toppings I list above we did ranch dressing, Crystal, mushrooms and onions, herbs, Crystal, grated cheese, sausage, herbs, Crystal, cheese. We like Crystal and a little spicy bite to our pizza. Can you tell?

Bake pizza for 15 – 20 minutes, until crust edges brown and cheese in center is melted and starting to brown. After 15 minutes watch pizza closely until it is browned to your preference.

Remove from oven, let cool five minutes, then slice and serve!

*an alternative to separately prepared onions and mushrooms is a quick mushroom onion sauté

Mini Pizza Pucks

mini pizza pucks_edited-1

Our whole family loves pizza. Lately I have been trying to find simple dishes for weekday meals, what with Little B getting involved in evening activities and Big D and I with busy work days. In our endeavor to avoid wheat there are few alternatives for quick pizza where we live. The local pizza places just give blank looks when the words ‘wheat free’ or ‘gluten free’ are used, and delivery is a joke when wheat free is concerned. To be fair, there is one place with gluten free pizza, but it is still has nutrition-poor carbohydrates in a rice based crust. Not the end of the world for Little B on the rare occasion, but for me and Big D, who need to avoid the carbs, it is not a solution. These pizza pucks I made are a result of spontaneous experimentation. I tried to combine my cheese crisps and low carb pizza recipes to make this meal and it turned out pretty darned good! They were quick, fun and Little B enjoyed helping making them, of course. I call them pizza pucks, not because they are overly hard or difficult to eat, but because you can pack them up, like pucks, and I am currently living in a place where hockey is popular. I am not yet ensconced in watching or playing the sport, I just went with it. And it is cold. What other time of the year can you call pretty much anything a puck? Besides being a good dinner, the leftovers worked well as a cold snack on the way to Little B’s soccer practice, or ballet, or whatever happens after five but before bedtime that does not involve crashing on the couch at home. What better snack than some protein before running around for an hour or more? Maybe I should come up with some pizza balls to go with the soccer theme, but that is for another day and time…

Mini Pizza Pucks

3 cups shredded mozzarella and cheddar cheese
1/2 cup golden flaxseed meal
1 egg
1 Tbsp dried parsley leaves
1 Tbsp dried basil leaves
1 tsp garlic powder
1 tsp sea salt
1 cup large black olives
6 roasted or pickled garlic cloves (you can use raw, but they may not cook through and cause problems for sensitive stomachs)
20 – 30 slices pepperoni
1/2 cup Parmesan cheese

Preheat oven to 350 degrees. In a food processor combine olives and garlic, then pulse until a rough paste forms. Set aside. In a medium bowl combine the mozzarella and cheddar cheeses with flaxseed meal. whisk the egg and add to cheese mixture, folding it in until the cheese is coated. Add the salt, parsley, basil and garlic powder, doing a final few stirs to distribute the spices. On two nonstick cookie sheets make flat piles of cheese, about 2 inches in diameter with about an inch between them. Spoon about 1 tablespoon of olive paste on each pile, spreading it gently with the bottom of the spoon. Place one to two slices of pepperoni on each pile, then sprinkle with Parmesan cheese. Bake in the oven (using two different rack levels) for 12 – 15 minutes, until the edges of cheese begin to brown and the pepperoni glistens. Yes, it must glisten to have the right flavor. Remove from oven and let cool for five minutes before serving.

Portabello Pizza

portabello pizzaThe first time I ever cooked with portabello mushrooms was about 15 years ago. At the time I was making a lot of pizzas closely following my discovery of pizza stones. They make the crust crispy all around and are  great for even cooking. I got into the habit of topping each pizza with two to three veggies and a meat. On some occasions my dinner guests were vegetarians, so minus the meat, but what to add to make the pizza hearty? I explored the produce section of the grocery store and came upon the portabellos – huge caps sitting over a sign that described them as meaty. Well, why not? If they don’t eat meat, why not serve them meaty mushrooms? The pizza with portabellos turned out great, and marinating the mushrooms added an extra layer of flavor. Since my last pizza stone broke and I started leaning toward low carb, I never replaced it. One recent tendency has been to make pizzas with low carb crust, and another is to reach back into my pizza past and snatch up the portabellos. This time I used them as the crust. They are quick and of course Little B can help with every step. Using tomato paste adds a spike of tomato flavor without adding much liquid. The one flaw, but not really, in this recipe is the wetness of the mushrooms. I will continue to explore how to dry out the mushrooms, because they soaked up a bit of liquid and the result is not what I would call hand pizza, but it tasted great. Grab a fork and knife for this flavorful rounds and dig in!

Portabello Pizza

4 large Portabello mushrooms, stems removed
1 Tbsp lime juice
1 small can Italian herb tomato paste (or plain past mixed with 1 Tbsp Italian herbs)
2 tsp dried oregano leaves
2 tsp dried parsley leaves
2 tsp dried basil leaves
2 tsp garlic powder
8 ounces pepperoni, sliced thick
2 cups grated mozzarella cheese
½ cup Parmesan cheese
Salt and pepper to taste

Preheat oven to 350F. Place caps stem side up on baking sheet, then sprinkle with lime juice, salt and pepper. Spread tomato paste on mushrooms, followed by a layer of basil, oregano, parsley and basil leaves, along with garlic powder. Place a layer of pepperoni slices and top with mozzarella and Parmesan cheeses. Bake for 20-25 minutes, until mushrooms are tender and cheese is melted and browning.

Squash Pizza

We love pizza and we love squash, especially spaghetti squash. It is not processed like store bought pasta or the flour used in most pizza crusts. Don’t get me wrong – I love pasta and pizza crust and pretty much any bread I encounter, but it never seems to leave after I eat it. I might as well just glue it on to my hips and butt instead of biting into it, because that seems to be where it goes. Not so with spaghetti squash. It is pretty darned good for you, as I have mentioned before, and is a great way to take care of those pizza cravings, because the wheaty crust of the traditional pizza is just not gonna work with our diet strategy. We have officially thrown up our hands and now make a casserole version of pizza. Yes you need a fork to eat it, but is it really a great loss? Not when it helps me keep my weight down. I am not saying this recipe will help you lose weight, but if you are watching your carbohydrate intake like me, there is nothing better for battling pizza advertisements. The squash does a wonderful job of helping the herbs mix and spread their joy, and thick sliced pepperoni is just heaven to me on a pizza. Omigosh is it good!

Squash Pizza

1 spaghetti squash
8-12 ounces pepperoni, sliced thick
2 cups shredded cheddar cheese
2 cups Italian mix cheese (romano, mozzarella, parmesan…)
2 cups roughly chopped mushrooms (or 8 ounces canned mushrooms)
2 Tbsp dried parsley
2 Tbsp dried oregano
2 tsp dried basil
2 tsp garlic powder
2-3 tsp sea salt
2 tsp red pepper flakes
1 tsp black pepper

Slice squash in half lengthwise and scrape out seeds and sinew. In a microwave safe dish place halves open side down and add about ½ cup water. Cook on high for 10-12 minutes. Preheat the oven to 350 Fahrenheit. While the squash cools prepare the rest of the dish – start with slicing pepperoni and roughly chopping mushrooms. When squash is cooled scrape out the ‘spaghetti’ with a fork into a bowl. Add mushrooms to the squash along with half of the herbs, salt and pepper and mix well. In a medium to large rectangular baking dish (no larger than 9×13) sprinkle about ½ cup of the cheddar cheese. Add the squash mixture. Take a mix of the cheese, about a cup, and spread on top of the squash mixture, pushing it into the squash a bit. Add the rest of the herbs and spices. Make a layer of the pepperoni, then top with the remaining cheese. Place in preheated oven and cook for 30-35 minutes, until cheese is melted and there is some browning. Let stand outside the oven for about ten minutes before serving. Slice like a casserole and serve with a simple garden salad.

Whole Wheat Pizza Rolls

I am a bit depressed. We have been in our new place for two days and our lovely gas stove is still without gas. Imagine my dismay when I realized all my plans for a cooking frenzy came to a screeching halt and the fridge/microwave marathon continues. But I have a kitchen! An actual kitchen and I can’t really use it. My own private hell, I say. I am very much tempted to go get a camping stove and carry on. Hopefully this is the last post from old stuff I stashed from the past. It begins in a way that is no surprise to most, with my daughter. I have a particular little daughter when it comes to sandwiches. The only sandwiches she will eat are peanut butter. Not peanut butter and jelly or peanut butter and banana, just peanut butter. Occasionally she will eat a sandwich with meat and cheese, but I do not rely on her to do so because it happens so rarely. She likes a lot of foods, just not always at a convenient time, like when it is put in front of her. On top of her sandwich issues there was a little boy at her two day a week pre-school that was allergic to peanut butter. This means that making a quick school lunch for her by slapping together a sandwich is pretty much out of the question. My solution was pizza rolls. It is similar to the method I use for doing wheaty peanut butter apple rolls, just with a comPLETEly different taste. She likes them, they gives her some protein in the middle of the day and don’t cause problems for her schoolmates. When I asked Little B to tell me which type of roll she liked best she paused a moment and said both, but when I asked her which one she wanted for ever and ever (her latest phrase) she pointed to the pizza rolls. Score!

Whole Wheat Pizza Rolls

½ can Grands® Golden Wheat Reduced Fat Biscuits
16-24 Turkey Pepperoni slices
½ cup shredded reduced fat colby jack cheese
2 Tbsp Oregano
½ cup tomato or seasoned pizza sauce

Preheat oven to 375F. Lightly grease large cookie sheet. Cut each uncooked biscuit in half. Roll out each half until each is about 4” in diameter. Place 2-3 slices of pepperoni on each round, keeping them about a centimeter from the edges. Spread each biscuit with about 1 tsp of sauce, sprinkle about 1 tsp of cheese on each and sprinkle with oregano. Carefully roll each biscuit until the opposite ends overlap*. Pinch open ends together in an attempt to contain the sauce. Place each roll seam side up on the cookie sheet, about an inch apart. Bake for 12-14 minutes until biscuits begin to brown.

*Next time I make these I plan on folding the biscuits in half and using a fork to pinch together the edges. Rolling them I think makes for easier toddler finger food, but if I am serving them to a mixed, slightly older crowd I can add more filling with the fold-in-half method.


Pizza Amore!

Big D and I have promised each other a pizza night for quite a while now, but things kept getting in the way. Then what do I do? I have a pizza party when out of town and he is stuck at home! Evil me! So last night we had our pizza night at home. Since Big D is sensitive to wheat and I am still working on improving my gluten free baking skills, we relied on a Bob’s Red Mill mix for the pizza crust. Here at home we are not equipped with a barrage of pizza making tools (my old pizza stone finally cracked after about ten years of good service and we use an ulu instead of a pizza cutter), so we relied on a cookie sheet for the baking. Little B jumped right in, stood on her learning tower (by the way, these things are awesome for safe learning in an adult sized world!), and helped top the pizza. The result was a successful experiment with plans to tweak our next attempt, because boy to we like pizza! The miniscule imperfections were mostly our fault, but we are okay with that, because there will definitely be a next time…

Gluten Free Pizza

1 package Gluten Free Pizza Crust, prepared

1 6-ounce can tomato paste

3 links hot Italian sausage, casing removed, broken up and cooked

10 baby portabello mushrooms, sliced and sauteed in 1 Tbsp butter

3 ounces pepperoni slices

5 cloves garlic, finely diced

2 Tbsp dried thyme

4 Tbsp dried oregano

5 ounces mozzarella cheese

3 ounces Parmesan cheese

4 ounces sharp cheddar cheese

1/3 cup coarse corn meal

Salt to taste

This is what we did:

Heat oven to 425F. Sprinkle corn meal on large cookie sheet (17.25”x11.5”). With wet hands (and keep a bowl of water close by to re-wet hands) press pizza crust dough out to edges of sheet. Bake for 7 minutes without toppings. It will puff up and start browning on the edges. Remove from oven and add desired toppings. We did tomato paste, garlic, herbs, some cheese, salt, pepperoni, mushrooms, sausage, more cheese, more herbs, maybe more salt. Return to oven and bake for 15-18 minutes until cheese in the middle is melted and bubbly. Slice in squares and eat!

This is what we are going to do next time:

The crust in middle of the large rectangular pizza we made was cooked, but thick. Next time we will make two smaller, thinner pizzas (freakishly similar to the instructions on the mix packaging – go figure), knowing that the middle may rise higher than the edges. Also, the dough was substantial and held its shape when we ate it, which excited us, but we thought it needed more flavor. We plan on adding salt and herbs to the dough before we leave it to rise. We cooked the pizza for 14 minutes, but think with thinner crust it could cook longer and brown safely without burning. Yes, we were afraid it was burning and took it out early, but low and behold, it could have cooked longer.


Pizza Pizza Pizza!

I returned home yesterday after visiting my in-laws and my mom. My brother was there too! What a treat! To commemorate our last evening together we made a total mess of the kitchen making pizza. One obstacle regarding the pizza crust was a lack of a recipe. The one I have relied on for years was at home (what I get for having not yet scanned all my old recipes), and the one my brother usually used was not at mom’s place either, so my brother dug around online and found this one, which worked great. Mom’s pizza stone got a good workout making FIVE pizzas and Grandma Heflin’s 80 year old cedar rolling pin did a darned good job on rolling out the dough. When the dough was ready and the toppings prepared we stuck Little B on a stool and had her help us with topping the pizzas. She loved throwing, er, placing the vegetables and pepperoni all over the place, especially in big piles. We had to make a couple of adjustments before they went in the oven, like reducing the pile of five cheese slices, but we all had blast. My brother was the work horse for the evening, watching the baking times, transferring the pizzas from the stone, and making sure everyone got what they wanted, or didn’t want, on the pizzas. Here is what we did. These things are fun and fun is good, to quote Dr. Seuss.

Pizza Pizza

2 batches pizza dough (makes about five 12-inch pizzas)

1 large can diced tomatoes

1 small can tomato paste

2 Tbsp plus ½ cup olive oil

1 clove garlic, crushed

Salt and Pepper to taste

2 bell peppers, cut into strips

10 baby portabello mushrooms, sliced about ½ cm thick

1 bunch basil, washed with stems removed

1 large can black olives, sliced into rings

½ large white onion, sliced thin julienne

5 ounces turkey pepperoni (or the fatty kind if you are not trying as hard as I am to justify eating pizza)

2 pounds buffalo mozzarella, sliced about ½ cm thick

1 cup corn meal

1 cup flour

Place pizza stone in cold oven. Turn oven on to 450-475F, depending on your oven. In a bowl mix together diced tomatoes, tomato paste, garlic, olive oil, and salt and pepper to taste. Smush some of the tomatoes, but leave some chunky. Roll out on floured surface 1/5 the dough into a 12 inch round. Transfer the round to a pizza peel (or the back of a cookie sheet) that has been sprinkled with corn meal. Spread a thin layer of olive oil (about 2 Tbsp) on the crust. Add about 1/5 of the tomato sauce*. Layer other toppings (mushrooms, pepperoni, olives, onions, basil) as desired, topping with 1/5 of the cheese. When oven and stone are hot, sprinkle the stone with corn meal then slide the pizza on to stone and cook for 14-16 minutes. If the first pizza does not brown on top you may need to raise the oven temperature.

While the first pizza is cooking, make sure you have transition stations set up (this is where the dishes and clean up time increased exponentially) – one platter for setting on the table, one surface for receiving a pizza just out of the oven, and one for a prepared pizza ready to go in the oven. If you have a pizza peel the pizza transfer from oven to cutting board is a breeze. If you don’t have a peel (like us), make sure you have the thickest oven mitts you can find, or check your grilling/fire pit supplies to see if you have at least one high temperature glove to help handle the stone. We had to remove it from the oven to slide it onto the cutting surface. It is really hot! If you don’t have a pizza stone the whole cooking time and transfer issue is completely different than what is described here, and I have faith you can figure it out. Good luck!

This baking method and timing melts the cheese, browns the surface a bit and cooks the crust, but it does not completely cook the vegetables until limp. We like ours a bit crispy. If you want your vegetables cooked a little more it may help to blanch or saute them before you start making the pizzas.

*On one of the pizzas we used a wonderful pesto instead of the tomato sauce. It was from Humble House Foods who sell at the Pearl Farmers Market. Amazing pizza results and the most delicious pesto ever!

Post Navigation