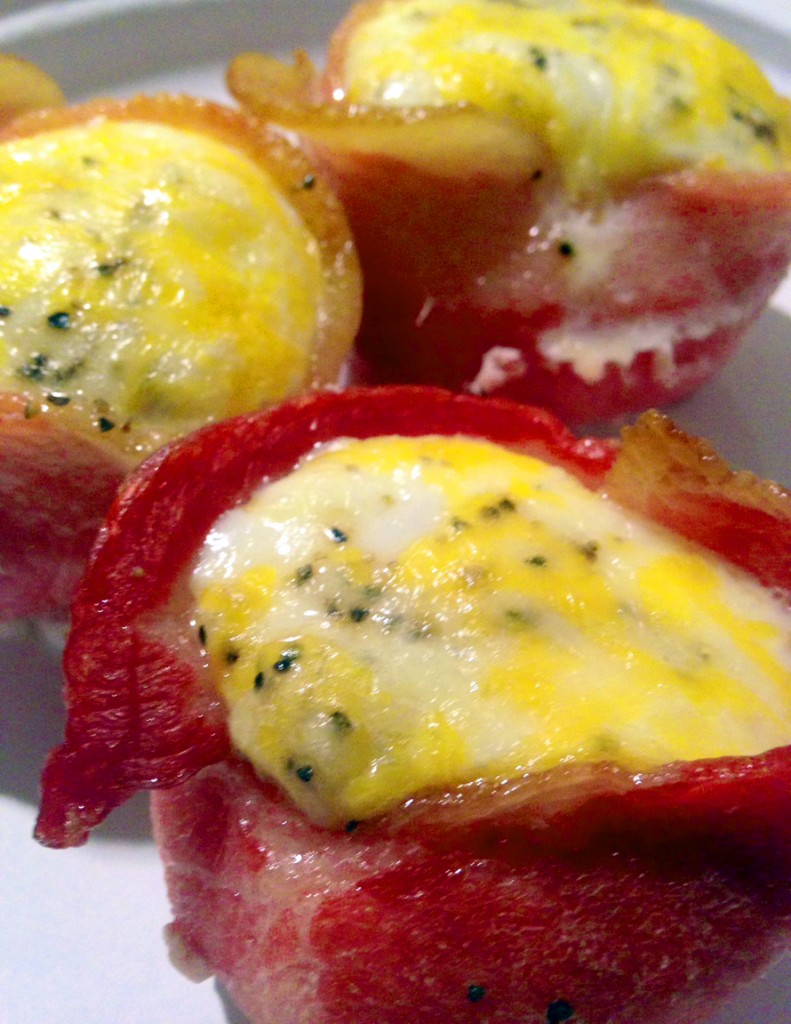
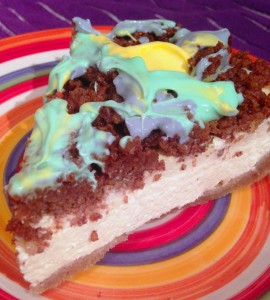
 In past years I have created a myriad of different King Cake-themed treats. This year I almost passed up creating a new treat, but then Big D opened his mouth. I do admit that most times when he does that the result is positive. Other times, not so much. This time when he got a look on his face and was about to talk I held my breath. Really? We don’t have enough possibilties to choose from? Really?! Well, after he finished sharing his idea (aka closed his mouth) I was sold. Really, we don’t have enough. More more more! This here treat is a wonderful combination of past creations – the limey cheesecake, the Unholy King Cake and King Cakelettes. I officially say, Big D, here and now, you were right…this time. The cheesecake is, as always, extremely creamy and satisfying. The crumbly, nutty topping reminds me of the spicy middle of a traditional King Cake, and the colored frosting provides for the traditional colors of Mardi Gras – green, gold and purple. I do wish the colored frosting was more vibrant in the picture, for I had to make a choice while waging a gentle battle. Today, being a gymnastics workshop day, Little B ran and flipped and tumbled pretty much nonstop for four hours. This means that her temperament, and mine, were at a bare minimum. After promising her for days she could help with this treat I could not refuse her here at the end. There was no margin for adjusting color or hue when mixing the three little bowls, so what you see is our wondrous treat with a pastel version of our dream. The good thing is she helped and looks forward to ending our feast tomorrow with a big slice. The bad thing is the decor is about four shades darker than planned. A small price to pay for some fun time with my little chef! Laissez les bon temps rouler!!!!! I hope you all have a wonder Fat Tuesday celebration tomorrow and are properly somber (whether from absinthe or faith or both) on Wednesday!
King Cheesecake
Crust
2 cups finely ground almond flour
2 Tbsp coconut flour
2 Tbsp butter, melted
1 tsp Stevita granulated sweetener
1 tsp ground cinnamon
1/4 tsp ground nutmeg
1/4 ground ginger
1 egg white, whisked (save yolk for filling)
Filling
16 ounces cream cheese, room temperature
1/3 cup sour cream
2 large eggs and 1 egg yolk, room temperature
3 Tbsp butter, room temperature
2 Tbsp heavy whipping cream, room temperature
1/3 cup Stevita, granular sweetener
2 large limes, zested and juice separated from meat (use less for milder lime tang)
1 tsp vanilla extract
Topping
1/2 cup raw pecans
1/2 cup raw walnuts
1 Tbsp ground cinnamon
2 tsp Stevita granulated sweetener
1/4 cup butter, melted
Dash sea salt
Frosting
4 ounces cream cheese, room temperature
3 ounces butter, room temperature
1 Tbsp Stevita
Food coloring (green, yellow, purple – made with one part blue and three parts red)
Make the Topping. Preheat oven to 350 degrees. Spread raw walnuts and pecans in one layer on a shallow, metal baking sheet. Place in oven for about five to eight minutes, until they begin to darken. Remove from oven, and set aside to cool. In a microwavable bowl add the butter. Melt on medium power, checking every 30 seconds, until completely melted. In food processor grind toasted nuts until they are a consistency of a rough meal. Add to the butter the ground nuts, cinnamon, Stevita and salt. Stir until well combined. Set aside.
Make the Cake. Preheat oven to 325 degrees. In 9″ pie dish cut a round of parchment paper that fits the bottom of the dish. In medium bowl stir together all dry crust ingredients. Add the butter and stir until the ingredients clump. Add the egg white mix until well combined. Crust will still be crumbly. Press crust into dish until bottom and sides are covered.For the filling add to a large bowl the cream cheese and sour cream. Whisk together until completely smooth. Add butter and stir again until smooth. Add eggs and yolk, stirring to incorporate and until smooth. Add sweetener, lime zest, lime juice and vanilla. Beat until well combined and smooth (see a pattern?). Pour filling into crust and gently smooth surface. Place cheesecake in oven. Bake for 20 minutes, until filling sets. Remove cake from oven and sprinkle topping on top – either evenly over the the entire top of the cheesecake, or Just along the edges, leaving a 2″ diameter space the middle uncovered, like the hole in the middle of a traditional King Cake. Return cake to oven for 10 more minutes. Turn off heat without opening oven door. Leave cake in the oven until mostly cooled, about two hours.
Make Frosting and Decorate. Whisk together cream cheese, butter and sweetener until well combined and smooth. Divide mixture into three separate bowls. Using green, yellow and purple food coloring, color the mixture in the different bowls until the desired tint is achieved. Using a spoon for each color drizzle the frosting over the top of the cheesecake – if you left the middle of the cheesecake clear of topping, I suggest you continue the theme of leaving the middle plain and drizzle the frosting over the portions with the topping. If the frosting is too firm to spread randomly you have two choices: 1) scoop frosting onto the bottom of a spoon and run it over the top of the cake, allowing it to catch on the pieces of topping, or 2) heat the frosting in the microwave at half power for 15-30 seconds until it is runny, then drizzle it over the top of the cake. If the topping was spread over the top of the entire cheesecake, then use any pattern you choose to apply the frosting.
Chill finished cheesecake at least one hour before serving.