Any Kitchen Will Do

Give me a kitchen and I will cook.

Archive for the month “September, 2014”

Bacon Wrapped Scallops

bacon wrapped scallops

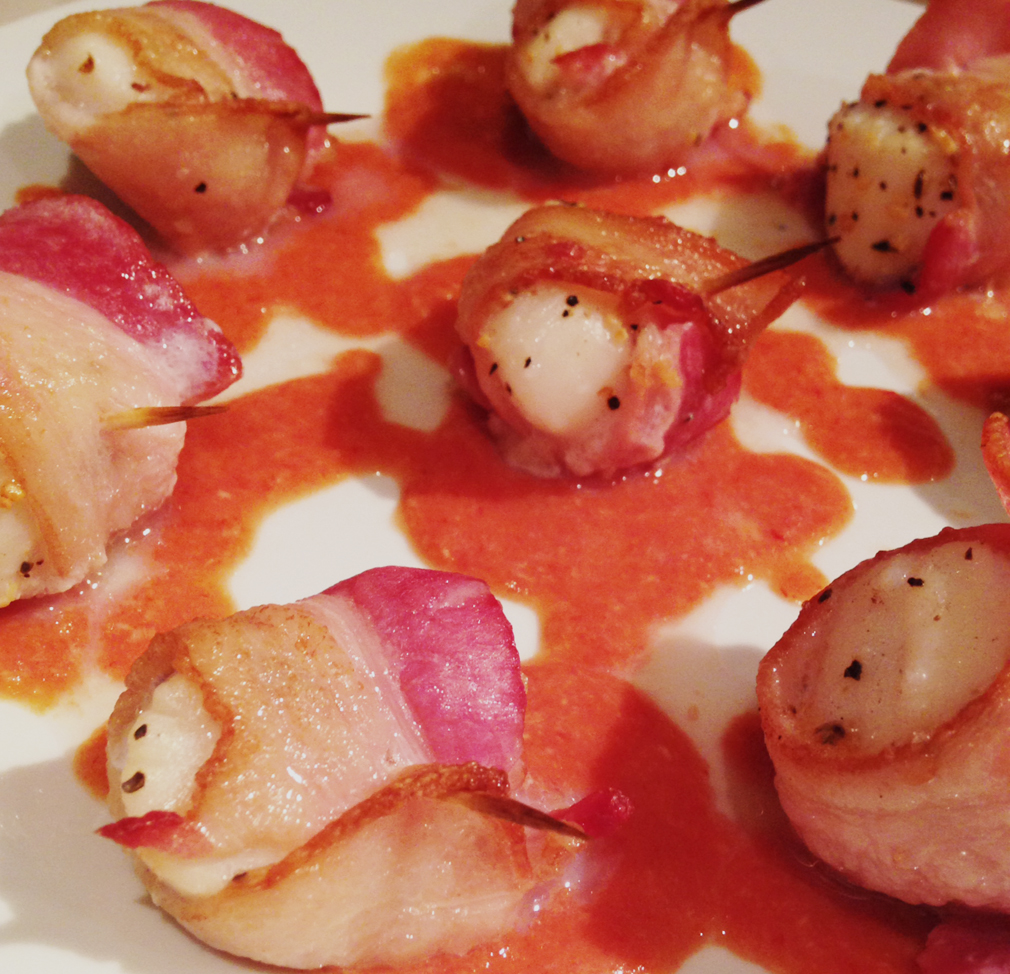
Big D is going to be so pissed that I did this while he was out of town. I just could not wait! There is a local restaurant that makes something similar, and I had a serious craving. The restaurant appears to wrap the scallops with bacon and pierce with toothpicks, then deep fry them and serve with hollandaise sauce. Their sauce is a bit subtle – it may be the version of sauce they make, but I have longed for something tangier when we have ordered and inhaled them as an appetizer. Not one to deep fry things, I decided to broil, since scallops are easy to overcook and quick cooking works well with the broiler. I was tempted to do more seasoning, but decided to keep it simple. I was not disappointed. These were so easy to make at home and delicious! I promise I will make them again sweetie and after you get home!

Bacon Wrapped Scallops

8 large scallops (about 1″ diameter raw)
4 slices bacon, cut in half
8 round toothpicks
Salt and pepper to taste

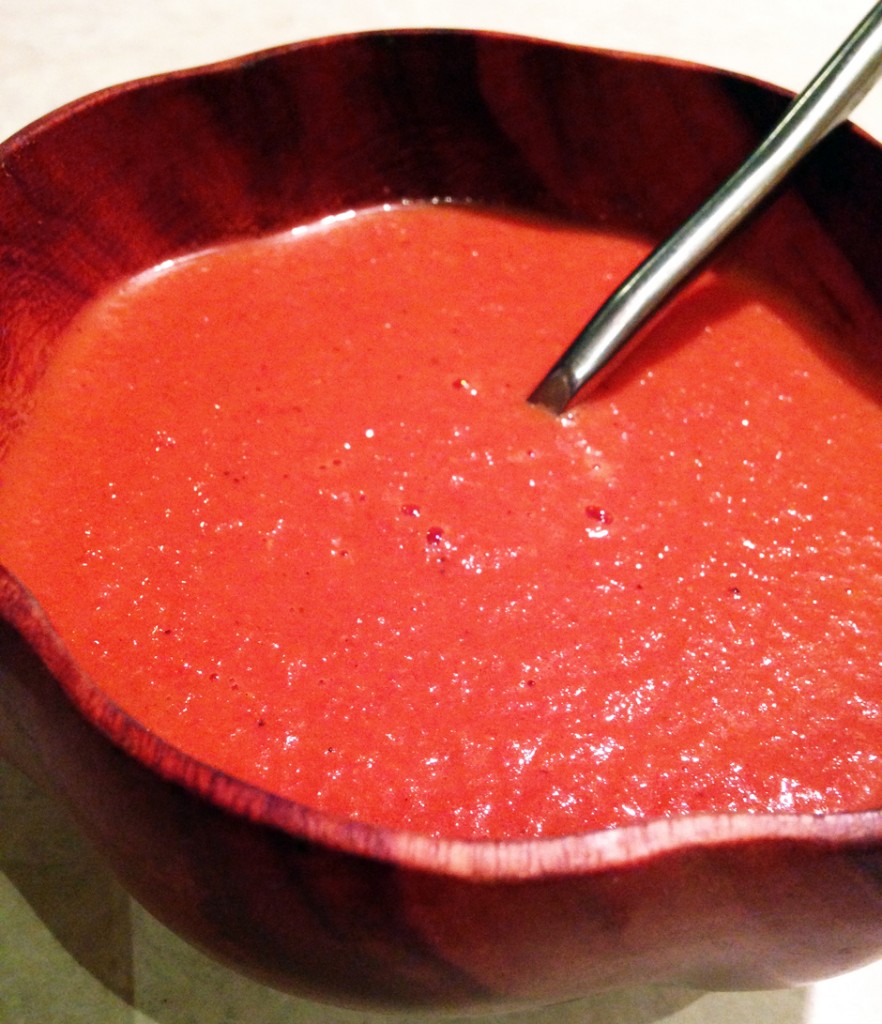
Spicy Cocktail Sauce

1 Tbsp tomato paste
1 1/2 Tbsp raw horseradish, grated
1/4 cup lemon juice

Preheat oven on low broil. Lightly sprinkle scallops with salt and pepper. Wrap a piece of bacon around a scallop, overlapping the edges. Secure the bacon with a toothpick, pushing it through both sides of the scallop. Repeat with all scallops. Place scallops on a shallow baking pan. Position oven rack about 8 inches below broiler. Place scallops in oven. Broil for about ten minutes, making sure not to overcook the scallops. If you only have one broiler setting assume it is high and reduce cooking time to 5-7 minutes, watching carefully – a few more minutes may be needed, depending on broiler heat. The bacon may smoke a bit. While the scallops cook make the spicy cocktail sauce: whisk together the paste, horseradish and juice until well blended. Sprinkle sauce on serving dish. Place scallops on plate and serve immediately after removing from the oven.

Chocolate Cheesecake

chocolate cheesecake
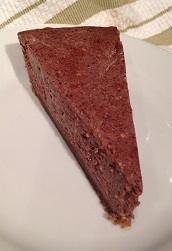
So the cheesecake saga continues. Our young friend Skinny D has been visiting with us on his first trip to Alaska. When I was making the limey cheesecake for Big D he got a similar ‘happy face like a kid with a new bike’ look as he requested a chocolate cheesecake. Of course I could not say no, and was curious how it would turn out, considering the smooth success from the first cheesecake attempt. I do wish to provide full disclosure here – I have made cheesecake before – it was a pumpkin cheesecake with a gingersnap crust. It was lovely and carby and wheaty. A healthier version may be in my future this fall, for I really liked the pumkiny goodness. Back to the here and now. This cheesecake was smooth like the last one, and Skinny D was very happy. So was Big D and Little B (although for some reason Little B did not like the crust). One piece of advice on cheesecake making – this cheesecake was smooth, but as you can see in the picture, there are little speckles. It is my fault. I did not ensure that the cream cheese was soft enough, nor did I take the time to do extra mixing, so little bitty pieces of cream cheese did not get thoroughly combined. Did not seem to have a negative impact on texture or flavor though. I bet I will take the time to do it right next time!

Crust
2 cups finely ground almond flour
2 Tbsp coconut flour
1 Tbsp butter, melted
1 Tbsp Stevita granulated sweetener
1 tsp unsweetened cocoa powder
1 egg white, lightly whisked

Filling
16 ounces cream cheese, room temperature
1/3 cup sour cream, room temperature
2 eggs, room temperature
1 egg yolk (retained from crust ingredients)
4 ounces unsweetened chocolate
1/3 cup Stevita, granular sweetener
1/2 tsp ground cinnamon
1 tsp vanilla extract

Preheat oven to 325 degrees. In 9″ pie dish cut a round of parchment paper that fits the bottom of the dish. In medium bowl stir together all dry crust ingredients. Add the butter and stir until the ingredients clump. Add the egg white, mix until well combined. Crust will still be crumbly. Press crust into dish until bottom and sides are covered. Filling: in large bowl combine cream cheese and sour cream. Melt chocolate in the microwave proof bowl – heat and stir in 10 second increments until chocolate is melted and smooth. Add chocolate to cream cheese and sour cream mixture. Whisk together until completely smooth. Add butter and stir again until smooth. Add eggs and yolk, stir to incorporate and until smooth. Add sweetener and vanilla. Beat until well combined and smooth. Pour filling into crust and gently smooth surface. Place in oven. Bake for 30-35 minutes, until filling sets. Turn off heat without opening oven door. Leave cake in oven until oven and cake are completely cooled, about two hours. Remove from oven  and chill for at least an hour. Serve plain or with fresh berries.

Limey Cheesecake

limey cheesecake

Of all the desserts in all the homes and restaurants and coffee shops I have visited, I am likely to pick cheesecake last. I actually like smooth, flavorful cheesecake, but I have found over time that I am picky and end up finding them icky. I tend not to pick it as my treat of choice because it is easy to make icky cheesecake. For me icky has a specific definition when it comes to cheesecake – that slightly rough, bumpy texture that tastes like something vague, usually plastic or paper, and is far from convincing me to think, ‘hmm, I like this’. Enter Big D. He loooooves cheesecake. I actually have not discussed the ‘icky’ version I tend to experience, but he got a sad little look the other day when we saw some cheesecake in the dessert display of a restaurant. ‘Can you make some?’ he asks hopefully. I say ‘yes, of course’, and his face lights up like a kid with a new bike. Don’t even ask me how many bikes he owns; needless to say, I have seen the look on him plenty of times before. Here is my attempt at cheesecake, with no wheat or sugar. I think it turned out pretty smooth and flavorful. No ‘icky’ factor for me this time! I would really disappoint myself if I contributed an icky cheesecake. There is enough of it in the world. And based on Big D’s reaction to eating it, I scored big on getting a repeat of the new bike face.

Limey Cheesecake

Crust
2 cups finely ground almond flour
2 Tbsp coconut flour
2 Tbsp butter, melted
1 tsp Stevita granulated sweetener
1 tsp ground cinnamon
1/4 tsp ground nutmeg
1/4 ground ginger
1 egg white, whisked (save yolk for filling)

Filling
16 ounces cream cheese, room temperature
1/3 cup sour cream
2 large eggs and 1 egg yolk, room temperature
3 Tbsp butter, room temperature
2 Tbsp heavy whipping cream, room temperature
1/3 cup Stevita, granular sweetener
2 large limes, zested and juice separated from meat (use less for milder lime tang)
1 tsp vanilla extract
Fresh berries (optional)

Preheat oven to 325 degrees. In 9″ pie dish cut a round of parchment paper that fits the bottom of the dish. In medium bowl stir together all dry crust ingredients. Add the butter and stir until the ingredients clump. Add the egg white mix until well combined. Crust will still be crumbly. Press crust into dish until bottom and sides are covered. Filling: in large bowl combine cream cheese and sour cream. Whisk together until completely smooth. Add butter and stir again until smooth. Add eggs and yolk, stir to incorporate and until smooth. Add sweetener, lime zest, lime juice and vanilla. Beat until well combined and smooth (see a pattern?). Pour filling into crust and gently smooth surface. Place in oven. Bake for 30-35 minutes, until filling sets. Turn off heat without opening oven door. Leave cake in oven until oven and cake are completely cooled, about two hours. Remove from oven  and chill for at least an hour. Serve plain or with fresh berries.


Baked Crispy Chicken

oven fried chicken

I have seen the use of crushed pork rinds as a ‘breading’ in a lot of different places lately. I was originally going to use our approach to breading we rely on for Scotch Eggs, using golden flaxseed meal, but wanted to try the pork rind approach first. We are usually dark chicken meat people, but our young house guest Skinny D likes white meat, so we caved in and made it too. Adding the variety gave us an opportunity to try three different chicken conditions – dark meat, white meat and skinless ‘tenders’. oven fried chicken panThe results were awesome – the pork rind breading worked on everything! Leftovers were a little soggy when microwaved instead of toasted/baked, but straight out of the oven worked for me as a fried chicken replacement. Big D found it to be a bit lacking in his pursuit of more crunch, but we have ideas to change that. Stay tuned!

Baked Crispy Chicken

8 chicken thighs, with bone and skin
2 chicken breasts, with bone and skin
1/2 cup butter, melted
2 large bags pork rinds
1 cup grated parmesean cheese
1/4 cup parsley, finely chopped
1 Tbsp garlic powder
2 tsp onion powder
2 tsp cumin powder
2 tsp sea salt
1 tsp ground black pepper
1 Tbsp dried oregano leaves

Preheat oven to 350 degrees. Line shallow baking sheets with aluminum foil. Using a blender or food processor cut the pork rinds into small crumbs. Place crumbs in large mixing bowl. Add cheese and spices to the crumbs and stir until combined. Remove bones from chicken breasts while leaving the skin attached, removing separately the long tenderloin pieces along the bone for ‘chicken strips’. Slice chicken breasts in half, making four evenly sized pieces. Season all pieces of chicken with sea salt. One at a time coat each piece of chicken with butter, then thoroughly coat all surfaces of each one wit the crumb mixture. Place each piece, skin side up, on the baking sheets, leaving about an inch of space around each piece. Bake for about one hour, until juices run clear. Serve immediately.

Adapted from Oven Fried Chicken at Buttoni’s Low Carb Recipes.

Tomato Soup

tomato soup

In the past I have talked about gazpacho and tomato artichoke soup, but this one is smoother and just as simple. There is a Little B story behind it. Kid menus in restaurants are horrible, for the most part. Hey kids! Have some wheat bread, some wheat pasta, some breaded stuff and some candy! Oh joy. Just what I want my daughter to consume and ping from for hours. True, there are some places that have good options (some steak houses actually have kid steaks – go figure!). We usually end up ordering vegetable sides or soups for Little B when we eat out. That, or share food we order jointly to share. No problem really, and agreeing on a dish with Little B always comes with negotiations. All of these possibilities work, and heavy reliance on servers who can actually take orders. One of Little B’s favorite restaurant soups is tomato. There are a few places in town that offer it regularly, so she often seeks it out. When we cannot find it we figure something out at the restaurant, then when she still yearns for it, I will whip up a batch of tomato soup at home. I often vary it a bit, depending what is in the fridge, but this is the basic tasty recipe, including bunches of veggies and some cream for fat. She slurps it up and always gives me a big thank you smile. The greatest thing ever.

Tomato Soup

3 14.5 ounce cans diced tomatoes
1/4 cup red wine
2 cloves garlic, crushed
1/4 cup chopped onion
1 stalk celery, chopped
1/2 tsp sea salt
Dash ground black pepper
1/4 tsp turmeric
1/4 cup heavy whipping cream

In medium pot over medium-high heat add all ingredients except cream. Cover and cook until bubbly. Stir, reduce heat to low and cover. Simmer for 30 minutes, until onions and celery are soft. Turn off heat and let cool for about ten minutes. Add cream and stir. Using a stick blender puree the soup until smooth. Alternately, put soup in a blender and puree until smooth. Serve immediately, or reheat but do not boil.


Mixed Meat Omelet

mixed meat omelet_edited-1Long long ago I owned an omelet pan. It was a nice omelet pan, used often to whip up the eggy concoctions. Less long ago I got rid of it. Not because it was unused, but in many respects redundant. Can’t the same thing be done with a frying pan? Over the years we have stocked and unstocked kitchens in our travels and moves. Often the ‘specialty’ devices get purged. You know what I mean – items that do one thing that can easily be done with another, like an avocado slicer (replaced by knife), smoothie maker (replaced by blender), or egg seperator (replaced by a hand or shell) or a food chopper (replaced by knife), or the omelet pan (replaced by a, well, pan). You get the idea. The omelet pan was sacrificed during one of these purges and not replaced. My omelets don’t look as pretty these days, but they sure taste good, and don’t stick. I am also an advocate for having the ingredients mixed and cooked up with the egg, not placed in the equivalent of an egg ‘taco’, like some restaurants serve – egg part of the omelet gets overcooked separately, then the actual ingredients get dropped in, egg gets flopped over it and served. If I wanted a taco I would order one. Anyway, here is a lovely combination, and my approach to making an integrated omelet, which I also addressed about two years ago with an onion omelet, which is still one of my standards, but tastes totally different. Enjoy both of them!

Mixed Meat Omelet

1 cup mixed leftover meat (in this case, pepperoni, prime rib and kielbasa sausage), cut in small pieces
4 garlic cloves, roughly chopped
1/3 cup finely chopped yellow onion
1 Tbsp bacon grease
4 eggs
Salt and pepper to taste
1 cup grated cheddar cheese
1 batch chimichurri (optional)

Heat bacon grease over medium-high heat. Add onions and garlic, cooking for about five minutes, until they begin to brown. Add meat and heat through. While meat and vegetable cook crack the eggs into a bowl, sprinkling with salt and pepper. Whisk eggs until uniform. When meat and vegetables are ready shuffle the pan so they are evenly distributed on the bottom of the pan. Turn heat down to medium-low. Pour in egg, tilting pan until the entire bottom has a layer of egg. Sprinkle cheese evenly over the top. Cover and cook for a few minutes, until egg begins to set. When edges hold their shape, carefully flip one half over the other. Slide omelet to the middle of the pan and cover, cooking for another minute to let egg set in new position. Turn off heat, cut omelet into three or four equal pieces and serve. Suggest serving with chimichurri, a side of bacon and some bread.

Post Navigation