Any Kitchen Will Do

Give me a kitchen and I will cook.

Archive for the month “July, 2014”

Creamed Cabbage Collard Mix

creamy collard cabbageLots of nights I open the fridge to figure out what needs to be cooked sooner rather than later, then I have a guide for our evening meal. Other times I go out on our balcony to see what needs to be harvested from our little container garden to use as a guide. This dish was a result of both guides. There was a partial head of cabbage in the fridge, and the collard greens on the balcony needed to be thinned so the smaller, younger leaves could thrive. The savory combination was a wonderful complement to a spicy meat dish and added the requisite fiber to the meal. I encourage you to grow your own garden, keep your fridge stocked with fresh vegetables and let them inspire what lands on your dinner plate. Cook well, eat well!

Creamed Cabbage Collard Mix

1/2 medium head cabbage, roughly chopped
2 – 3 cups collard greens, stems removed
1/2 cup mayonnaise or 1/4 cup heavy whipping cream
1/2 tsp chili powder
Salt and pepper to taste

Heat a large frying pan to medium-high heat. Add mayonnaise or cream and chili powder. Heat until mayonnaise is melted or cream is bubbly. Add cabbage and greens. Sprinkle generously with salt and pepper. Stir until vegetables are coated. Let cook for about ten minutes, stirring every few minutes until cabbage and greens are wilted, but still slightly crispy. Remove from heat and cover until time to serve.

Stuffed Bell Peppers

stuffed pepper plated

We had some lovely visitors from Texas recently. While they were here we had big plans to cook a lot of stuff for them, but we ran out of meals and time. These bell peppers were still hanging out in the refrigerator after they left, so I needed to do somstuffed peppers panething wonderful and amazing with them. It was not their fault they were usurped by a brunch buffet, grilled ribeye, bacon wrapped asparagus and pizza. I used to never like stuffed peppers. They were often overcooked, filled with flavorless rice and left me hungry. When I first made stuffed peppers for myself I decided they needed to eliminate the unsavory elements. Heh. Get it? Unsavory? Okay, I will stop. I first tried stuffing poblano peppers, which turned out great. This time I worked with the previously spurned colorful bell peppers. Bottom line, I added flavor and subtracted rice. The peppers turned out to be a lively, satisfying meal on a rainy day after much errand running. Next time the peppers will not be second or third fiddle, but instead the first choice. Yummy!

Stuffed Bell Peppers

5-6 bell peppers, any color
1/2 large onion, finely chopped
1/2 pound ground beef
1/2 pound ground sausage
1 egg
1 cup Colby/Monterrey Jack cheese, grated
1 tsp ground cumin
5 garlic cloves, chopped
1/2 tsp sea salt
1/2 tsp ground black pepper
1/2 tsp red chile flakes
1 cup beer (recommend an IPA)
5-6 slices Monterrey Jack cheese
Salt to taste
1 batch chimichurri (optional)

Remove top of each pepper, also removing pulp and seeds from inside. Rinse, shake out excess water and place in 8 x 11 inch baking dish. Divide onions equally among the peppers by dropping them into the bottom of each. Sprinkle onions with salt. In a large bowl combine beef, sausage, egg, grated cheese, cumin, garlic, salt, black pepper and chile flakes. Squishing it all together with your hands is the best method. Firmly press the meat mixture into each pepper until it is level with the top. Bake for 45 minutes. Place a slice of cheese on top of each pepper. Return to oven and bake for an additional 20 minutes, until peppers are soft and cheese begins to brown. Remove from oven and let cool for about ten minutes. Suggest serving drizzled with chimichurri.

Herbilicious Chicken

herbilicious chicken

It is so herby and so delicious it must be herbilicious! And chicken to boot! We even made it twice in one week, which is very rare in our house – not only making the recipe, but making chicken. We are a protein kind of house, and most often rely on beef and pork to keep up our intake. Chicken is okay, but not our first choice. A dish has to be really good to get a double-make in a week. Our little balcony garden is growing like gangbusters and the nibbling birds cannot keep up, so we actually get to eat some of our harvest! Our oregano and sage look a little sad, but the cilantro, basil and parsley are very happy with the circumstances, and they do what they can to try and keep up with the towering collard greens. After not doing much gardening in recent years I am now reminded by our little plot just how much better food tastes when I grow it myself. It is amazing how much the sense of taste is influenced by the feeling of such an accomplishment. I can only imagine this dish would also be herbilicious with other herb combinations, so walk out in your garden and grab some handfuls. Let me know how it goes!

Herbilicious Chicken

6 – 8 chicken thighs, skin on
1/4 cup butter
3/4 – 1 cup heavy whipping cream
1 cup fresh parsley
1 cup fresh cilantro
1/2 cup fresh basil
3 cloves garlic, chopped
Salt and pepper, to taste

Season chicken thighs with salt and pepper. In large frying pan over medium high heat place all thighs in the dry plan, skin side down. Cook until skin begins to brown, about eight minutes. Turn thighs and cook for five more minutes. While chicken cooks roll the parsley, cilantro and basil together and slice them up, then finish with a rough chop. Add butter to pan and flip thighs so they are all coated with butter. Add herbs and garlic, again turning the thighs so they are coated. Cover pan and cook for ten more minutes, until juices from chicken run clear. Add cream and stir thighs until cream mixes with juices and herbs. Lower heat and let simmer until cream is heated and chicken is cooked completely, about five more minutes. Serve immediately.

Peanut Butter Chocolate Chip Protein Cookies

protein pb choco cookies

These cookies look ready for a picnic, don’t they?! First impressions may give the appearance of being just a regular cookie, tempting you to abandon your diet or require an additional 20 minutes on the treadmill. Not so! Look closely and you will see they are full of protein, and only have sugar if you choose for them to. We love our sugar free chocolate bars all chopped up and performing the role of topping. Our cookie treats have evolved from the wheaty, to the sugary but not wheaty, to this finale of non-wheaty and non-sugary. We are pretty impressed with ourselves, especially Big D who has become quite the consummate baker! I even changed the name per his request to put the protein after the peanut butter and chocolate chip – I am so proud! Enjoy these cookies on a Sunday picnic, or a Tuesday night – what a treat!

Peanut Butter Chocolate Chip Protein Cookies

1 cup natural peanut butter
1 1/2 Tbsp apple cider vinegar
1 Tbsp butter
3 eggs
1 cup almond flour
2 Tbsp whey or hemp protein powder
1 1/2 tsp baking soda
3 Tbsp Stevita
¼ tsp sea salt
1 cup chocolate chips (or sugar free chocolate bar, chopped)

Preheat oven to 350 degrees. Combine peanut butter, butter, eggs and vinegar in medium bowl. In a separate bowl combine remaining dry ingredients except chips. Add dry mix to wet ingredients and stir until well blended. The dough will be stiff. Cover two baking sheets with parchment paper – paper is optional if sheets are nonstick. For each cookie take 1 – 2 tablespoons in hand and shape a cookie, about  ¼ inch thick and place on cookie sheet. Leave approximately ½ inch between cookies. Gently press three to four chocolate chips into the top of each cookie. Bake for 20-22 minutes, until cookies begin to brown. Remove from oven and cool completely before removing cookies from parchment paper.

Chocolate Bar And More

chocolate bar

Dark chocolate is one of my favorite things. It makes me very happy. Chocolate chips have eluded us in our sugar free world – if chips are available at the store they either have sugar or artificial sweeteners we don’t eat. Some recent failures resulted in chocolate that started melting right after removing it from the freezer, or the balance of chocolate and sweet was not quite right. The coconut butter seems to make a big difference in consistency and flavor. It is made from the meat of the coconut, but with a mild taste. It also stays nice and solid at room temperature, which helps these bars hold up to room temperature adversity. You still get a little meltiness on your fingers when handling it, but what good chocolate bar doesn’t? This chocolate bar recipe does not result in perfect little chips with curly peaks, but the resulting small bits that serve the same purpose are lovely. We joyfully toss them into our homemade mint chocolate chip ice cream and cookies. Sweet levels can be adjusted to taste, and the bar also melts smoothly for home mocha lattes or dessert topping. I am continuing my quest for a curly topped chip, but what is life without a quest?

Chocolate Bar

3 ounces coconut butter
2 oz unsweetened chocolate, chopped
½ cup Stevita
2/3 cup cocoa powder
1/4 tsp vanilla extract

In a small saucepan add coconut butter and chocolate. Melt over low heat until smooth. Remove from heat and stir in Stevita, cocoa powder and vanilla. Continue stirring until smooth. Pour into molds or spread in a pan lined with aluminum foil. An 8×8 size pan makes for the thickness of a typical chocolate bar. Refrigerate until chocolate sets firm, about one hour. For chocolate chips use a sharp knife to chop into small pieces.


Funky Fries

jicama fries
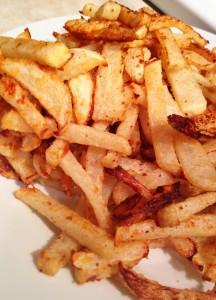
I don’t use jicama in my recipes very much. Most often I include it on crudites platters to add variety from the typical celery and carrot sticks. Just last week at a potluck there was a delicious, crunchy salad made with jicama. It was very good, and took me to researching a bit more about using it for other things. You may be sick of hearing about this by now, but we continue to seek out low starch, healthy replacements for otherwise unhealthy comfort foods. When we recently succeeded in making burger buns there was a logical inquisitiveness about the traditional side dish – french fries. I really like the baked fries I made a few years ago, but they rely on potatoes, which are not a routine part of our diet anymore. I know from experience that jicama is crispy and a bit sweet, and in my opinion more flavorful than the traditional potato used for fries. I was skeptical about my hunt for the jicama at the local stores. Everything we buy arrives here on barges or planes (nope, no driving to Juneau!). Although local stores place orders for goods, there is always a mystery about what will actually arrive when, so it is hard to predict much of anything. I was overjoyed when I walked in and there they were, in their muted brown glory – a big pile of jicama! I even found a rather symmetrical one, for they can come in rather lumpy shapes and sizes sometimes. The peeling of it was easy, as usual, and the chopping duties were shared with Little B. I figured these fries could handle some stronger, savory flavors like garlic, onion and parmesean. I was right! The big pile was eaten up by the three of us and our visiting family, so I cannot speak to how robust (or not) leftovers would be. If I ever find out in the future I will let you know. Serve them along with some ketchup (or plain, or with mayo or whatever you like) and you have fries!

Funky Fries

1 jicama
1 Tbsp avocado oil
¼ cup parmesean cheese, finely grated
¼ tsp garlic powder
¼ tsp onion powder
¼ tsp sea salt

Preheat oven to 350 degrees. Peel and slice jicama into strips no thicker than ¼ inch. Slice strips in half. In a large bowl toss fries with the avocado oil. In a plastic bag combine cheese, garlic, onion and salt. Add fries and shake until coated. Place fries evenly spaced on a baking sheet, for too little space in between can prevent crisping. Depending on the size of the pan and the jicama, you may need two or more pans. Bake for 15 minutes. Remove from oven and flip the fries. If you are baking with two pans make sure you switch their position in the oven – my oven bakes faster on the bottom rack if there are two in at the same time, so switching after tossing helps them all cook evenly. Return to oven and bake for 10 – 15 minutes more, until edges are crispy and brown. Serve immediately. Recipe varied from the one found here.
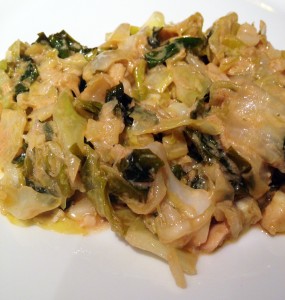
Baked Portobellos

stuffed portabello
I have mentioned in the past my long relationship with portobello mushrooms, their meatiness without being meat, and how well they work as a base for pizza and all things baked. This recipe relies on the mushrooms to utilize leftover chopped onions and sausage. Easy to put together and slide in the oven, I set them up then piddled while they were busy cooking. I was able to to shower, we made ice cream for dessert and even cleaned up the house a bit. Don’t worry. The flavor combination was nice a balanced, with the dressing flavoring the mushroom and the sausage and onion dancing well together. After dinner there was not much left to do but cuddle and read and chat with my family on our big green couch. That is the way I like spending weekday evenings after a busy day – a full stomach from a satisfying meal, and do nothing time, which dones more than nothing for us. That, or the beach, but the beach was for another day.

Baked Portabellos

4 large portabello mushrooms
1/2 – 3/4 cup ranch dressing
1/2 pound ground hot Italian sausage
3/4 cup white onion, chopped
8 slices cheese
1 batch guacamole (optional)

Gently cook sausage in a frying pan over medium heat, breaking it up into bite-sized pieces, but not too small. It can be left slightly pink (it will finish cooking on the mushrooms). Preheat oven to 350 degrees. Place mushrooms cap side down on work surface, leaving the stems attached. With the back of a spoon spread dressing on the gills of the mushrooms. Place sausage pieces on the gills, surrounding the stem. Sprinkle onion on top of the sausage. Place two pieces of cheese on top of each mushroom, lining them up unevenly so most of the sausage and onion is covered. Place mushrooms on baking sheet. Place sheet in oven and bake for 45 minutes to one hour. The cheese should be melted and starting to brown. Remove from oven and let cool for five minutes. Serve plain or with guacamole.

Post Navigation