Any Kitchen Will Do

Give me a kitchen and I will cook.

Archive for the month “October, 2013”

German Chocolate Fusion Cake

german chocolate fusion cake
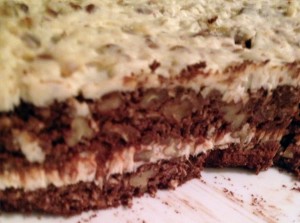
I woke up this morning with a plan to fulfill a birthday request. It sounded simple – a low carb, wheat free German Chocolate Cake for dessert. Now, I could have gone to a version I made before, but there were a few barriers to doing so: 1) in our little hotel kitchenette with not much room, 2) the absence of measuring cups, a mixer, blender, food processor or more than one mixing bowl (which was actually an ice bucket absconded from the ferry we floated to Juneau on), 3) time was not in abundance. To balance all these challenges I did some digging to come up with a simple recipe that kept the ingredients list of the cake short, allowed for minimal processing, and maximized the small kitchen and involvement of Little B. The results were wonderful, if I may say so myself, and achieved the German Chocolate Cake flavors, if not necessarily in a more traditional presentation. Why do I call it a fusion cake? Because I was inspired by a energy bar recipe. I got some inspiration from the recipe found here, then leaped off into a search for my own results. Big D and I talked recently about coming up with some low carb, portable snack or energy bars. Something we could throw in a backpack to nourish us during long hikes or camping trips, beyond the old reliable of mixed nuts or peanut butter. This cake is a step in that direction – I think with a few tweaks of the cake portion of the recipe we could have some good snack bars, but that is a different story. This cake gave Big D the nutty, coconutty, chocolaty birthday dessert flavors he wanted, which was most important to me. My initial hesitation in even trying to make the cake, what with everything else going on in our lives lately (under-supplied kitchen, new town, looking for permanent housing, furlough, new job, new everything), helped me get everything back into perspective. Cooking always has and still does calm me, and stressing about giving a gift is unnecessary if you create it from the heart. Happy Birthday Big D!

German Chocolate Fusion Cake

Cake
1 cup almond flour
2 scoops vanilla whey protein powder
½ cup cocoa powder
2 cups Stevia in the Raw
1 cup unsweetened coconut
1 cup pecans, finely chopped
4 large eggs
1 cup heavy cream
1 cup water
3 tsp vanilla

Topping
12 ounces cream cheese, room temperature
2 Tbsp coconut oil
2 Tbsp heavy cream
1 1/2 cup Stevia in the Raw
½ cup unsweetened coconut
½ cup pecans, finely ground

Preheat oven to 350 degrees. Place all dry cake ingredients into a large bowl. Stir until well combined. Add the eggs, cream, water, and vanilla. Stir again until batter is well combined. Pour into two greased (or lined with parchment paper) 9-inch baking rounds. Bake until solid firm in the middle. It will not rise very much. Baking time will be 35 – 45 minutes. Remove from oven and let cool completely. Remove rounds from pans and peel off parchment paper. Make the topping while the cake bakes and cools: combine cream cheese, heavy cream, coconut oil and Stevia in the Raw in sauce pan. Heat through and stir until smooth. Set aside and let cool about five minutes. Add coconut and pecans and stir again until well combined. Let topping cool completely. Place one cake round on a serving plate. Top round with half of the topping. Place second round on top of first, then finish the cake with remaining topping, spreading it on the sides if there is enough – the layers will be thin so you may not need to put on the sides at all. Chill to let the topping set. Serve cold or remove from refrigerator about one hour before serving.

Seals Kitchen

seals kitchen history

If you notice the categories for each blog entry I make a Kitchen is always included. There are a slew of them now. Each time I decide on categories for an entry I pick the kitchen where the dish was made. Some kitchens I use are borrowed from friends or relatives, and some are part of the various places where we have lived.  They all possess a different set of tools and amenities, which translates to different challenges. When I started this blog the name came from the fact we spend time in many different places and I love cooking in any type of kitchen encountered. Over the next few months I am going to sprinkle you with posts about the different kitchens, giving you some insight and hopefully some laughs about idiosyncrasies of each kitchen.

I am going to start with the kitchen where I first began blogging – Seals’ Kitchen. The picture credit goes to Little B – she ran around the house taking pictures one day and I got a kick out of this one. It is a kitchen steeped in family history and cherished by many. When we lived in North Texas it was in the house where my mother-in-law grew up. Big D’s grandparents built and added on to the house over approximately sixty years, so in addition to having a lot of character, the kitchen was built to perfectly suit Grandma Seals. She was about 5’2” tall, and the counter was built to match. Compared to my 5’10” frame, I did a lot of stooping when cooking there – a problem mostly solved by using a stool. She was a popular baker and cake maker for the small community, so storage of tools for making special event cakes and goodies was apparent. Plenty of storage! The kitchen had a dedicated water heater for the sink, which made for a wonderful, endless supply of hot water. A plethora of power outlets were also available, allowing for all the appliances to sit out on the expansive counter space and be immediately ready. It also had a built-in kitchen table – when full the table could seat about ten people. The size worked well for big parties, as well as preparing food. A corner of the table was also often used to long talks a person or two, long homework sessions and art projects. When we lived there a lot of neighborhood kids came in and out to grab a drink or a snack, but we also had some quiet meals for just the three of us – me, Big D and Little B.

Little B had a lot of first in the kitchen – she turned one and two years old while we lived there. Her first forays into cooking happened at the top of her learning tower against the counter (the juicer was especially fun). She learned to crack eggs and stir and mix and eagerly watch things bake through the oven door. I don’t know if she will remember much of it when she is older, or even now, but I know her great grandmother’s spirit got a kick out of her experiences in the space.

The space was huge and open. Almost too huge – I often forgot where I put away less frequently used equipment and food. Getting down on hands and knees to reach the storage under the table was a funny site. An actual window above the sink made for some pleasant seasonal views when dishes were being washed (no dishwasher, but two big sinks were well worn of hot soapy washing water). It was easy to keep using parts of the counter and table, then use another part and another part. Suddenly, the whole kitchen was a mess and made for the need of some MAJOR clean up time. I never felt isolated in the kitchen – clear views of the stairway, entry into the bedroom hall, living room, dining room, back door and front door were available. You would have to try hard to miss something going on in the house if you were in the kitchen. I am sure that was an accident. Heh. I have very fond memories of the kitchen and the people that filled it during our time there. I can only imagine its impact on those who shared the space for sixty years.

Broccoli Beer Cheese Soup

beer cheese soupAs the weather cooled in Maryland before we moved, I had an immediate urge to start the making of soup. I am particular about the temperature of my food liquids – cold stuff in warm weather and warm stuff in cold weather. Any other combination just feels wrong to me. I am often made fun of about my idiosyncrasy (insert Big D laughing here), which I believe is pretty common. Am I really alone on this? A hot cup of coffee in the heat of July makes me feel as if I am burning up from the inside. A cold smoothie in December makes me shiver for an hour. That is why my gazpacho happened in June and iced coffee in July, but then I delved into warm drink mixes in October and here today I offer soup with two of my favorite ingredients – beer and cheese. A challenge I often have when making a liquid dish with cheese is ensuring the cheese is well combined, and is balanced with the liquid. I think I found a good balance here. Your results may vary, but taking time to gradually add and fully incorporate the cheese seems to be the secret. This soup has a strong flavor because of the strong beer, so if you want a more mild soup, then vary the beer, for it will be your guide. And make sure you make it during cooler weather because that is the only reasonable time to eat hot soup, right?

Broccoli Beer Cheese Soup

1 Tbsp butter
1 garlic clove, crushed
½ small onion, finely chopped
1 small head broccoli, roughly chopped
12 ounces hoppy beer (suggest India Pale Ale)
2 cups sharp cheddar cheese, grated
1 cup mozzarella cheese, grated
½ cup heavy whipping cream
¼ cup Parmesan cheese (optional)

In a medium sauce pan combine over medium high heat melt the butter. Add the garlic and onion, cooking until transparent. Add the broccoli and toss, letting it cook for a minute or two. When the broccoli begins to sweat a bit, about two minutes, add the beer. Bring mixture to a boil and turn down temperature to low. Cover and let simmer for about ten minutes, until onion and broccoli is very soft. Remove from heat and let cool for a few minutes, until it is safe to puree. With a stand blender or hand blender in the sauce pan, puree liquid and vegetables until all the pieces are very small and uniform. Return mixture to the stove top over medium high heat and make sure it returns to a boil. When hot, gradually add cheddar and mozzarella cheeses, about 1/3 cup at a time, and stir until each portion is completely melted and combined. After all the cheese is combined, turn down temperature to low and let simmer for about ten minutes, stirring after five minutes. Add the whipping cream and stir some more. If you want the soup smoother, again use the blender to achieve desired smoothness, but remember that it will always be a little bumpy because of the broccoli. Serve immediately, sprinkled with Parmesan cheese.

Topped Oatmeal Cookies

oatmeal cookies no wheat

We made these for Santa last year, topped with blueberries. We decided our house was the only one in the whole wide world where he would get blueberry oatmeal cookies. In the morning the cookies and milk were all gone! He must have liked them. I forgot to take pictures then, but recently made a batch with Little B and she wanted to top them with sugar free chocolate chips instead of blueberries. Wheat free and sugar free, these went with Little B to her last day with her daycare group in Maryland before we moved. The group gets so excited just being around each without any stimulation, why the heck would I put wheat or sugar in the treats?! They were soft and chewy and seemed to be a hit. We may make them for Santa again this year, and try again to make them memorable. Involving Little B in deciding the topping and standing back so she can stir stir stir makes for a great opportunity to practice measuring, mixing and creativity. Go crazy with the toppings – she was so proud to share her creations. I got the original idea here, but tweaked to my liking. Thanks Alton!

Toasted Oatmeal Cookies (no wheat)

4 cups old fashioned rolled oats
1 tsp baking powder
½ tsp baking soda
1 tsp cinnamon
½ tsp sea salt
1 tsp unsweetened cocoa powder
1 cup butter, room temperature
1 cup granulated stevia in the raw
3 large eggs
2 tsp vanilla extract
1 cup optional toppers (raisins, blueberries, sugar free chocolate chips, etc)

Heat the oven to 375 degrees F. Spread oats in a single layer on half-sheet pans and bake until lightly toasted, about 20 minutes. Watch carefully to avoid burning. Remove the oats from the oven and let cool for 2 to 3 minutes. Grind half the toasted oats in a food processor until they are the consistency of whole wheat flour. Add the baking powder, baking soda, cinnamon, cocoa, stevia and salt, then pulse to combine. Combine the butter, egg and vanilla in a mixer and mix on medium speed for about a minute. Slowly add the oat mixture and the remaining oats until just combined. Let batter sit and thicken if it is soupy and will not hold shape if scooped. Using a teaspoon, scoop batter and drop onto baking sheets lined with parchment paper. If adding a topping gently push into the middle of each cookie. Bake the cookies for about 12 minutes until they begin to brown around the edges. Remove the pans from the oven and let the cookies cool on the pans for 2 minutes. Transfer the cookies to a cooling rack until cooled completely – they should remain soft and chewy. Store in airtight container.


Poached Salmon

poached salmon

As we head towards our new home in Alaska I ponder the loveliness of the salmon we can get up there. The salmon season is coming to an end as I type, but the bounty will be enjoyed all year. I get a serious craving about once a week for salmon. I have been trying to appreciate Atlantic salmon, but the taste is a bit too mild for me, compared to Alaskan and Pacific versions. Depending on my craving, I vary the preparation – do I want tart, or sweet and spicy, or maybe traditional dill with citrus? I should have called this post ‘variations on a salmon’ because each time I make it the ingredients vary. I am going to discipline myself for the time being and make sure you have a good base recipe, then list some variations that give the salmon a subtly different flavor. I am all kinds of in the mood for salmon lately, because thoughts of Alaska remind me of it so! We are excited to return to the most awesome state ever, and the home of the bestest salmon ever. Even if you can’t find the freshest or never frozen salmon, this recipe still works on any piece, as long as it is completely thawed. As you see, we like our salmon warm but still pink in the middle – to each his/her own…

Poached Salmon

Basic
1 – 2 pound fresh salmon fillet
1 lemon
4 Tbsp vinegar (champagne, red wine or white wine)
2 Tbsp butter or extra virgin olive oil
Salt to taste
Additional ingredients from the variations below

Preheat oven to 350 degrees. On a shallow baking sheet place a piece of aluminum foil – twice the length plus about four inches – with the center of the foil in the center of the pan. Place the salmon fillet skin side down in the middle of the foil and bend up the foil edges, so the liquid does not leak out. Drizzle juice from half the lemon over the fish, followed by drizzling vinegar. Sprinkle salt over fillet lightly. Add any additional ingredients from the variations below. For variations with liquid ingredients I recommend mixing them all together before adding to the fish. Fold over the edges of the foil and seal into a pouch so no fish is exposed. Bake for 15 – 25 minutes until desired doneness. It is better to under cook than over cook, then let it set outside the oven covered up – it will still cook and reduce the risk of it overcooking and getting dry.

Variations

1 Tbsp fresh dill
1 clove garlic, finely minced

or

2 tsp ginger, freshly grated
2 Tbsp soy sauce (gluten free if you are sensitive, because regular soy sauce has wheat in it)

or

3 Tbsp fresh cilantro leaves
1/2 tsp chili powder
1 tsp ground cumin

or

1 Tbsp honey
1 tsp ground cinnamon
2 Tsp ginger, freshly grated

or

1/2 cup mayonnaise
1 tsp garlic powder
1tsp onion powder

Post Navigation