Any Kitchen Will Do

Give me a kitchen and I will cook.

Archive for the month “May, 2013”

Steak in Tomato Spinach Sauce

sauteed beef with tomato and spinach sauce

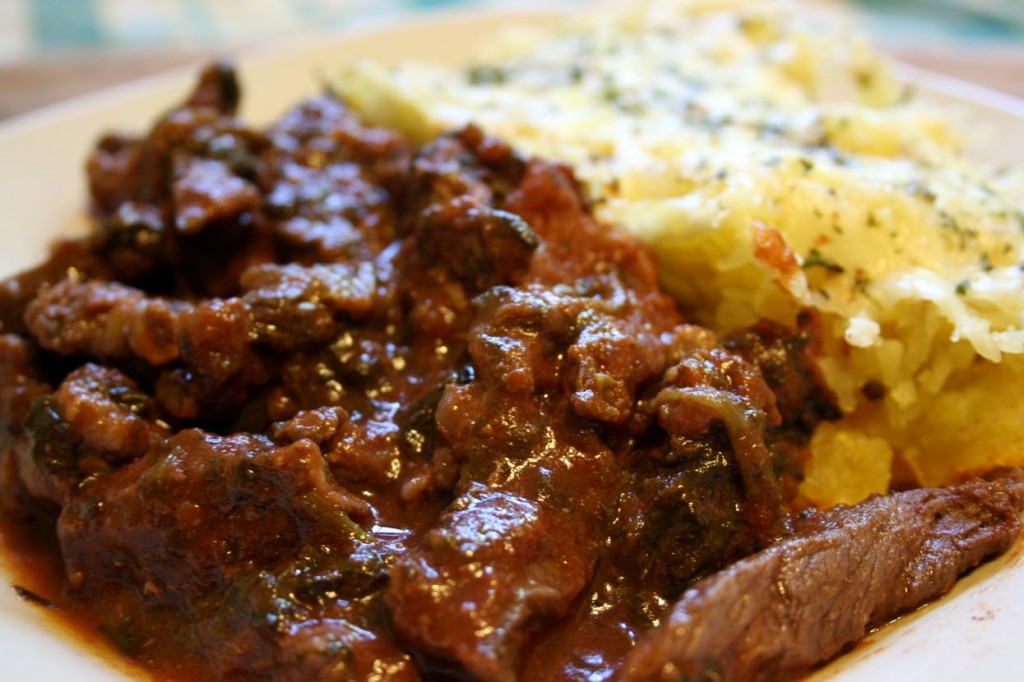
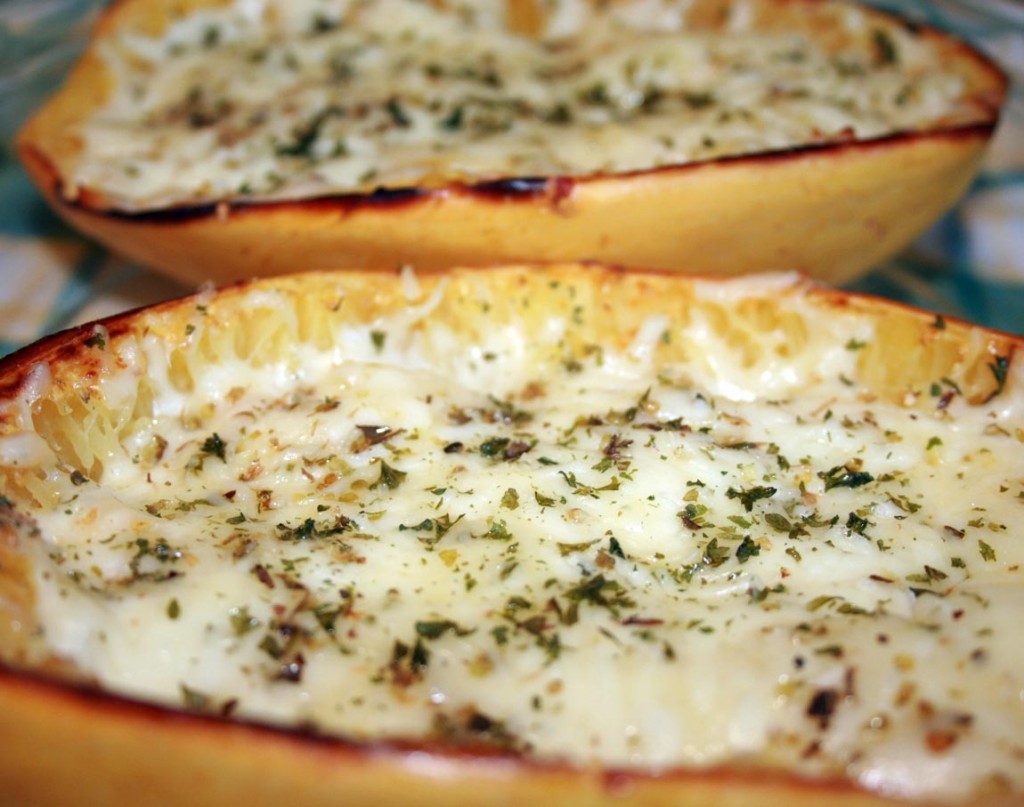
We are moving soon. Again. Not a big move for now, just a short term local move before a bigger move. We don’t know when or where the bigger move will occur, but want to be ready, which means not signing a long term lease or making a real estate purchase. A move translates into me trying to clear out the fridge, freezer and pantry. The less I have to move that is perishable or heavy, the better. This recipe used the last big can of tomatoes from the pantry and some stray steak from the freezer. I like never-been-frozen steak straight off the grill, but if it has been frozen I don’t mind baking or broiling or smothering it in sauce. I like how the tomato and spinach made the sauce nice and rich. Serve it next to or on top of some baked spaghetti squash. I ate too much. Roll me on over to the couch!

Sauteed Steak with Tomato and Spinach

1 Tbsp extra virgin olive oil
½ medium yellow onion, roughly chopped
3 cloves garlic, roughly chopped
2 cups fresh spinach
12 – 14 ounces tomato puree
½ cup dry red wine
2 tsp dried oregano
2 tsp dried parsley
1 tsp ground thyme
1 tsp sugar or sweetener equivalent
1 ½ Tbsp butter
1 pounds thin steak
Salt and pepper to taste

Slice steak against the grain into bite-sized pieces, then season generously with salt and pepper. Set aside. Roughly chop spinach into 1-inch pieces. In medium pot over medium-high heat add olive oil. When oil is hot add onion and garlic. Cook until onion and garlic begins to brown, about two minutes. Add spinach and toss with onion and garlic until most of it wilts, about three minutes. Add oregano, parsley, thyme, tomato, sugar/sweetener and wine, then stir. Lower heat to simmer, and cook uncovered for about ten minutes until it begins to thicken. Cover sauce and cook for 20 – 30 more minutes. Set aside. Right before the simmer time is over heat a shallow saute pan over high heat. Add the butter. Just before it begins to brown add the meat and toss until coated with butter. Continue tossing until steak is cooked to desired doneness (for me about 3 minutes for medium rare). Remove from heat. Add the meat to the sauce, stir and continue simmering for about five minute. Salt to taste. Serve immediately over spaghetti squash, pasta or rice.

Baked Spaghetti Squash with Cheese and Herbs

baked spaghetti squash with cheese and herbs

This stuff is just plain cute. Besides being yummy, serving it in the squash skin makes it fun to eat! I remember when I first had spaghetti squash. My mom served it under spaghetti sauce and said it was just like pasta. That caused the problem – unintended, but problematic. I expected some slight mushiness that started to soak up the sauce. What I got was slightly crunchy strings that mixed with the sauce, but did not absorb. I did not find it appealing after the first encounter. Flash forward a few years.  I tried spaghetti squash again, with the expectation of squash, not pasta. It tasted lovely, absorbing the garlic and herbs tossed with it, instead of futilely attempting to soak up marinara. Now that I think back at the two experiences it reminds me to be realistic with Little B when she is trying something new. We often introduce new foods to Little B that may look like other stuff she has had, but will feel and taste different. For example, when you eat regular or instant pudding, then are given chocolate chia pudding, you will have different experiences. They both taste good, but the texture is very different, not to mention the expansive difference in nutritional value. Honestly, I sometimes generalize and refer to most meats as ‘roast’, because she likes roast and it is easier. When it is truly something new I try to describe it for her so she is more willing to not spit it out. When she likes something new she really likes it, but as she gets older she is actually less inclined the try something new. I think it is because of her natural desire right now to display her independence more than not wanting to try something new. I hope it is temporary because she likes spaghetti squash and it is so much better for her than pasta. My ultimate goal is to have new experiences be positive for her. Not always fun or ideal, but result in some learning experience that will move her forward, for the world is full of new experiences. There will be many more new food experiences in her life and I want her to jump into them feet, or mouth first with passion. I know it has made a world of difference for me!

Baked Spaghetti Squash with Cheese and Herbs

1 spaghetti squash
1 Tbsp extra virgin olive oil
Salt to taste
1 tsp garlic powder
½ – 1 cup mozzarella cheese, grated
¼ – ½ cup Parmesan cheese, grated
1 tsp dried oregano
2 tsp dried parsley

Preheat oven to 375 degrees. Cut squash in half lengthwise and remove seeds. Drizzle olive oil on the halves and use your hands to spread it all over the exposed meat of the squash. Place halves face down on baking sheet. Bake for 30 – 45 minutes until inside of squash is soft, but not mushy. Reduce oven temperature to 350 degrees. Flip over squash halves, carefully hold the hot squash with a mitt or towel. Using a fork, scrape the squash meat off the skin, but leave it in the shell. Sprinkle the squash with salt and garlic powder, then gently toss the meat within the skin. Sprinkle with a little more salt. Divide mozzarella on each half, followed by the oregano and parsley. Finish with sprinkling the Parmesan cheese on top. Return squash to oven on baking sheet, cheese side up. Bake for 15 – 20 minutes, until cheese is melted and beginning to brown. Remove from oven and serve immediately – small squash can result in an entire half being a side dish, while larger squash may need to be cut into quarters for serving.

Mojito

mojitoThe first true mojito I had was made by a neighbor many years ago. She prepared a big pitcher as cocktails at the beginning of a dinner party. When poured over ice and muddled mint, it was a welcome refreshment on a warm Virginia evening. Now, many years later in Maryland, watching the tops of the trees sway their new heads filled with leaves, I sip a mojito. The weather is again dropping in temperature from 70 to 50 degrees as rain clouds blow in. Little B plays hopscotch while Big D lounges just inside on the couch reading a book. Yep. Life sucks and I would not trade it for the world.

Mojito

½ lime, divided into thirds
2 – 3 sprigs fresh mint
1 packet sugar or sweetener (about ½ – 1 teaspoon)
1 part rum
5 parts club soda
Ice

In a tall glass add lime pieces, squeezed, and half the mint leaves, gently torn or muddled. Add sweetener and rum. Stir mixture with teaspoon until sweetener is dissolved. Add soda and then ice to fill the glass. Imbibe. Relax.

Wiggly Gelatine Rectangles

wiggly gelatin rectanglesRooibos tea is a beautiful thing. It tastes good when simply brewed, or in the special way Big D spices it up as iced tea with cinnamon, nutmeg, cloves and citrus when he brews it. Actually, a combination of red rooibos and green rooibos produced the best batch of iced tea I ever had. When Big D first discovered it we could not find it plain in stores, just with other flavors or sweetened up. I found the quick dissolve versions of the tea with peach flavoring to be okay, but not really tasting like tea. We ended up ordering red and green rooibos it in bulk online out of necessity – it was not to be found in any store anywhere near us. The special thing about rooibos tea is the fact it is naturally caffeine free – not processed to be decaffeinated or manipulated to be some arrogant, snooty herbal tea combination. Rooibos is really flavorful tea without pretense. From what I can tell, it is a common beverage in South Africa grown in a specific regions there, and not something you typically find at your local cafe in America. It is a sad thing for America, because it is a lovely tea, if you had not noticed my opinion from the above tea meanderings. Try it if you get a chance. On to the wiggly squares. I found that the flavored gelatine selection at the store includes two bad choices: sweetened either with sugar, or aspartame. Both options are very unappealing. I turned to the top left section of the shelf and saw my solution. Good old plan unflavored gelatin. It can be manipulated in so many ways. Here is a fun, slightly sweet treat that lasted two days, because Little B was very much on a wiggly streak.

Wiggly Gelatin Squares

½ cup lemon or lime juice (you can use orange juice if fresh squeezed)
2 – ¼ ounce packs unflavored gelatine
1 ½ cups brewed rooibos tea, reheated to boiling
1 ½ tsp equivalent of pure stevia

OR

½ cup lemon or lime juice (you can use orange juice if fresh squeezed)
2 – ¼ ounce packs unflavored gelatine
1 pack 4C Totally Light Tea2Go Iced Tea Mix Red Tea Antioxidant Peach Flavor
1 ½ cups boiling water

OR

½ cup lemon or lime juice
2 – ¼ ounce packs unflavored gelatine
1 cup boiling water
5 drops red food coloring
½ cup seltzer water

In a medium bowl add juice and gelatine. Let sit for about one minute, until it the gelatine soaks up all the liquid. Add the tea and stevia (or the tea pack dissolved in the boiling water), then stir until gelatine powder is dissolved. If using ½ cup seltzer add it now and stir a bit. Pour liquid in small baking dish or baking sheet, so it is about ½ inch deep. Chill until set, about three hours. Cut in squares or rectangles and gently lift out with spatula. Play with your wiggly treats then eat! If you have any leftovers store with cling wrap between layers in an airtight container.

I Love You Cake

flourless chocolate cake with chocolate cream

Little B loves parties, especially birthday parties. We never have enough reasons to have a cake or open presents. Pretty much every day one toy or person gets a ‘birthday party’, usually involving an intricately constructed tower out of blocks, wrapped in a bath towel and proudly presented. When an already made muffin or cookie will not suffice as the birthday cake, we will make what Little B calls an I Love You Cake. She calls it that because it is made with love and shared with people we love. If we don’t love someone they cannot have any. Her description. I would not necessarily deprive a person of cake if I felt no love for them, but the size of this cake makes it a non-issue most of the time. There is more to making the cake than just having a good dessert. I have learned over time that Little B often wants to do things over and over to practice new skills, and to do so the process does not have to be big or intricate. This cake is perfect – no wheat, no sugar, just the right size to not have leftovers and it gets cooked in the microwave. For today’s cake Little B enjoyed mixing the ingredients with her whisk ‘until it all looked the same’ and concentrated fully on covering with frosting ‘so the whole cake is a secret underneath’. She has really been on a kick to do more frosting practice, as you may remember from the strawberry cupcakes made a while back. I adapted this recipe from Ally over at This Equals Everything. The cake was a lovely, light dessert after feasting on some white pizza we also made together, and she even let Big D help!

I Love You Cake

Cake
1 large egg
1/2 teaspoon vanilla
1 tablespoon heavy cream
1 tablespoon butter, softened
2 tablespoons cocoa
2 tablespoons granular erythritol (I used Truvia)
10 drops liquid stevia
1 teaspoon baking powder

Chocolate Whipped Frosting
½ cup heavy whipping cream
2 tsp granular erythritol
1 Tbsp cocoa powder

Spray a 2-cup measuring cup or small bowl with cooking spray. Add the egg and beat it with a fork. Add the remaining ingredients and whisk until a smooth batter forms. Microwave on HIGH 45-75  seconds or until it puffs up and no longer looks wet in the center. Let it sit for a few minutes, then pop it into the freezer for about five minutes – when you take it out gently coax the cake from the container, which should come out smoothly. While the cake cools make the frosting. For the frosting put the cream, Truvia and cocoa in a tall sided bowl or container. Whip for about 20 seconds with a hand mixer or stick blender until stiff peaks form. Spread the cake with chocolate whipped frosting to cover the whole thing, or simply a dollop of whipped cream, if desired.

Real Taco Meat

real taco meat

I give up. My nagging of Big D to write a guest post here in my space and talk about some of the awesome meals he makes our family is over. I would love him to update here after he sees it and make fun of all the ‘mistakes’ I make in the ingredients and process. This is the best way I know of to goad him into talking food here. If he does, you will get a taste of his instinctive method of cooking. If he doesn’t take the bait, you still get a recipe from me that reflects a basic version of what we create, eat a lot of and enjoy. I spicing varies with every batch, but it is so easy to make a big pan of it and have it around for quick meals. You can never go wrong using a package of ground beef with this recipe. It reminds me of Texas and the two week party in San Antonio called Fiesta! It happens every April, and seeing the pictures coming out of San Antone recently, along with the memories of partying it up myself when I lived down there, gave me a serious hankering for some good taco meat. Not what you get out of a prepackaged mix, or find in a school cafeteria, but the real taco meat I grew up with, as did Big D. We like it really spicy around here, and achieve an acceptable level of spice with the wonderful smokiness of chipotle peppers in adobo sauce. They are optional, of course, but add a level of flavor Big D and I  have not found elsewhere. Big D often eats it simply as a pile of meat and cheese, occasionally with some vegetables underneath. You can see from the picture I often surround mine with sauteed veggies underneath (this time with cabbage) and top it with tomatoes, cucumber, olives and sour cream. If you look closely, you will actually see meat! The meat can of course also be served with tortillas, but we don’t keep such things around the house anymore. Take a siesta and enjoy!

Real Taco Meat

3 – 4 Tbsp bacon grease or other high heat fat
3 Tbsp cumin seeds
4 garlic cloves, crushed
1 Tbsp red pepper flakes
1 Tbsp Chili powder
1 tsp red cayenne powder
1 Tbsp cumin powder
2 chipotle peppers with 1 Tbsp adobo sauce (optional)
1 medium onion, chopped
1 ½ – 2 pounds ground beef
6 – 8 ounces amber or dark beer
1 tsp sea salt

In a large skillet over high heat add grease. When it is hot add the cumin seeds, red pepper flakes and optional chipotle peppers. Stir frequently until they begin to darken. After a few minutes add the garlic, chili powder, cayenne pepper, cumin powder and optional adobo sauce. Stir for about a minute until it too darkens. Add the onion and cook until the onions begin to sweat and brown. Add the ground beef, breaking it up into small pieces while also combining it with the onion and spice mixture. Add ½ tsp salt and continue stirring. When about half the liquid has reduced, about five to eight minutes, add the beer. Sip on the rest of the beer in the bottle. Continue cooking over high heat until the liquid reduces again. When most of the liquid is cooked off turn down to medium heat and continue cooking until most of the liquid is gone. The meat should begin searing. Drink some more beer. After searing the meat for about a minute turn down the heat to low and simmer. Taste and add more salt to preferred saltiness. Let sit with the heat off for about ten minutes before serving.

Cucumber Goat Cheese Bites

cucumber goat cheese bites

I always love goat cheese, but somehow missed eating it lately. I recently tried to remember the first time I had it – the tart, smooth experience flirting with my tongue. I think it was in Golden, Colorado, while lunching in a little cafe in the historic downtown area. For the life of me I cannot remember the name. I would know it if I saw it again, but since I am Maryland at the moment, such an ability is not very helpful. It was spread on a chicken sandwich, in lieu of mustard or other condiments. I remember leaning on the table with my eyes closed, staring at it, wondering where the cheese had been all my life. Granted, I was only 25 or so, but it seemed such a long time to have been without goat cheese! I may have eaten it before, but passed it off as some other ingredient. Since that chicken sandwich I scour menus for it and grab packages now and then from the store. I get unreasonably excited when a restaurant offers a dollop on top of an otherwise basic green salad, or includes it in a cheesy dippy appetizer. My friend over at What’s For Dinner started on a goat cheese kick recently and, inspired, I now eagerly follow suit. On top of the goat cheesiness hankering, the warmer weather is upon us and I am looking to make some cold dishes. Here is a simple cold appetizer, or green salad substitute, that combines flavors my family and I love. The black olives are especially for Little B, who has adored them ever since Great Aunt Debby stuck them on her chubby little one-year-old fingertips.

Cucumber Goat Cheese Bites

1 English cucumber, washed with peel on
5 ounces goat cheese, room temperature
1 tsp dried parsley leaves
½ tsp dried basil leaves
½ tsp garlic powder
5 – 8 extra large black olives, drained and patted dry
Salt and Pepper to taste

Cut cucumber on the perpendicular, to create 1/3 to ½ inch thick slices. Scoop out an indentation about ¼ inch deep on one side of each slice, allowing for the cheese filling to anchor itself. You can use a small melon baller or 1/2 teaspoon scoop. Stir together cheese, parsley, basil and garlic. Sprinkle indentation and top of cucumber slices with salt and pepper. Using a spoon place some goat cheese mixture on top of each slice, filling the indentation and creating a smooth mound on top. Slice olives in half lengthwise, then place a half on top of each cucumber slice. Chill until served.

Chocolate Stout Cake with Mint Frosting

Around here May Day (or Beltane for us) is a wonderful double celebration. On this day nine years ago Big D and I got married at sunset on a beach in Nassau, Bahamas. The golden light in the sky worked its magic to form a beautiful rainbow over the ocean, right in front of storm clouds, which were floating away after a brief afternoon shower. It was an unexpected symbol on the day of our joining I will never forget. Beltane is popular for Handfasting ceremonies, but we were past the year and a day temporary ‘contract’ of a Handfasting, so we dove right into getting fully hitched. We had a small, powerful group of friends and family with us on the beach that day, which makes the memories even more bittersweet as the years pass. The past nine years have been full of travel and adventure and appreciating the awesomeness of our world. Little B joined us about four years ago, which provided me a new perspective on the world as a mother. me and d great bearBeing a wife and mother has forced me to explore who I am and make sure my small corner of the world fits not only the people in my family, but me as well, in my ongoing quest to remain whole and well. I am so blessed and enriched because I joined forces with Big D. It has sometimes been a bumpy ride, but the bumps have made the whole ride a wondrous thing to behold. I wish for everyone such an experience with another person in their lifetime. Our little family has formed traditions that make for some slightly unconventional holidays during the year. We always celebrate Beltane and our Anniversary with food and drink, oftentimes with friends and family (when they are geographically convenient) and forever will include a rather obscure movie – The Wicker Man. Not the silly version with Nicholas Cage, but the original, released in 1973, with the usually cool and smooth Edward Woodward (aka The Equalizer). We don’t go so far in our celebration to (SPOILER) sacrifice a virgin, but we do dress up and decorate and dance, anticipating a late spring and summer full of fresh fruits, vegetables and everything being green. chocolate stout cakeSpeaking of green, maybe I should talk a bit about today’s recipe. We had a full house on St. Patrick’s Day this year. I was so busy posting about the Strawberry Chocolate Bacon Cake right before the Day and Shepherds Pie on the Day that I never got around to posting about the cake I made for dessert on the Day. This cake is not too sweet, which helps bring out the stout flavor, and the frosting gives it a balance for those who like sweeter sweets. It is very rich, which means not much is needed in a serving. The bright shade of frosting reminds me of spring and the nearing summer these days more than St. Patrick’s Day, so I thought it was a fitting post for our pending celebration incorporating stout, IPA, ale and other things decadent. Merry meet and have a blessed May Day! Slainté!

Chocolate Stout Cake with Mint Frosting

Cake
2/3 cup butter
1 cup unsweetened cocoa powder
1 tsp vanilla
8 egg whites
¼ teaspoon cream of tartar
1 cup stout (I suggest Guinness)
2 whole eggs
8 egg yolks
2 cups granulated sweetener or equivalent
1 tsp Celtic sea salt
1 cup coconut flour

Frosting
8 ounces cream cheese, room temperature
½ cup salted butter, softened
1 – 2 tsp mint extract
½ tsp vanilla
Green food coloring
1 cup sweetener or equivalent

Preheat oven to 350 degrees. In a saucepan, melt the butter over medium heat. Add vanilla and cocoa powder, then mix well. Remove from heat and let cool. In a separate bowl, beat egg whites and cream of tartar until stiff peaks form; set aside. In another bowl mix together stout, 2 whole eggs, 8 egg yolks, sweetener and salt. Slowly mix in cocoa mixture. Add coconut flour into batter and mix until it is very smooth. Fold egg whites into batter until combined. Pour batter into greased bundt pan. Bake for 30-35 minutes or until a toothpick inserted into the center comes out clean. Let cool and gently remove from pan. While cake cools make the frosting. Whip together the cream cheese, butter, mint extract and vanilla. When the frosting is smooth gently fold in 3 – 5 drops of food coloring, until it is the desired shade of green. Add the sweetener and continue whipping until it is combined. Chill frosting until cake is cooled and ready. Frost cake with a thin layer all over – it is okay if there are bits of cake sticking out – makes it look even more minty and chocolate. Slice and serve.

Post Navigation