Any Kitchen Will Do

Give me a kitchen and I will cook.

Archive for the month “April, 2013”

Lemon Mustard Chicken

mustard lime chicken_edited-1
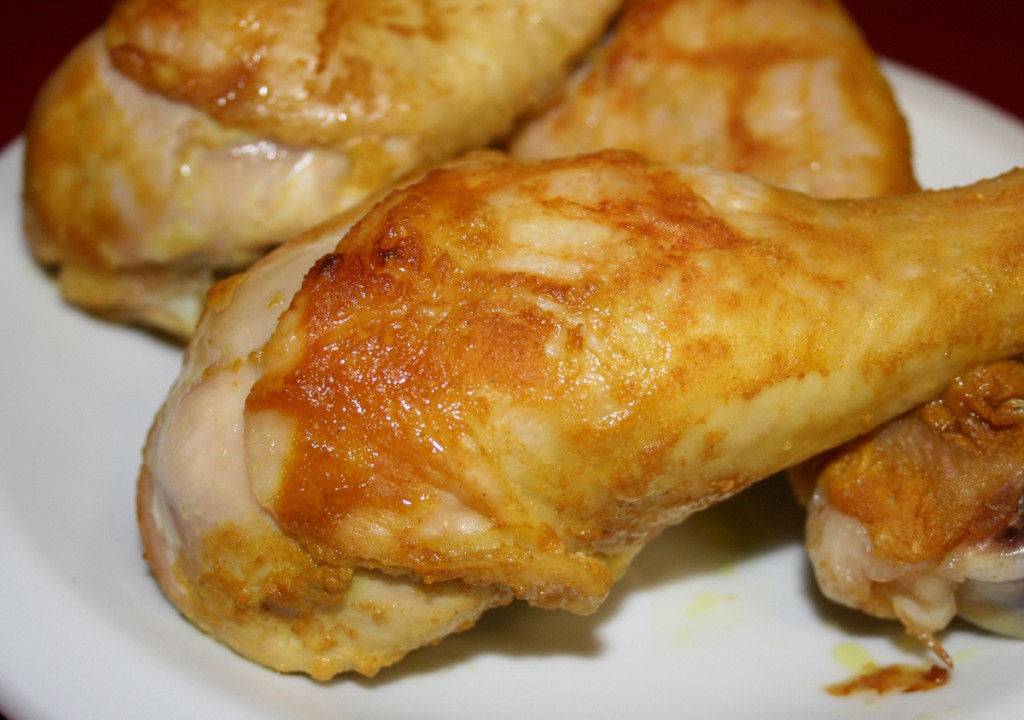
I know I know. You need another baked chicken recipe like you need a hole in the head. I have been on a tart and tangy kick lately, and was drawn to the mustard in the refrigerator door. I have found that mustard is a great thickener for sauces when flour or cream just don’t fit the bill. That is, if you like mustard, which I do. The flavor of these legs (I used a package of drumsticks for this batch) reminded me of roasted chicken I had many years ago, which was coated with what I decided was a mustard sauce. There was a little restaurant in Denver I liked going to in the late 1990s called Chad’s Grill. Their other food was good, too, but the chicken was addictive as far as I was concerned. I ate my share of salads and burgers and a great variety of daily specials. The atmosphere was very relaxing and open, which made for some long happy hours spent chatting with buddies. I can’t say this recipe has anything to do with that sauce I enjoyed many times in Denver, but as I said before, it sure is a pleasant reminder for me. This time of year in Denver we would be enjoying the warmer weather and trying to avoid afternoon showers that would continue throughout the summer. I would be itching for the weekend to come to explore Dinosaur Ridge or poke around Red Rocks. I will end the reminiscing and lick my lips. The sauce I whipped up worked nicely to flavor the chicken, and the turmeric turned everything it touched yellow. I am still working on getting the stain out of Little B’s white t-shirt.

Lemon Mustard Chicken

8 – 10 chicken legs, skin on
1/2 cup yellow mustard
1/4 cup lemon juice
1 Tbsp Worcestershire sauce
2 tsp garlic powder
1 tsp onion powder
1/2 tsp turmeric
1 tsp salt
Salt and Pepper to taste

Lightly season the chicken with salt and pepper. In a 9×13 baking dish place seasoned chicken. In a medium bowl combine mustard, lemon juice, Worcestershire sauce, garlic, onion and salt. Drizzle sauce over chicken and make sure the top of the chicken is covered. Bake for 45 minutes to one hour, until juices run clear.

Smothered Pork Chops

smothered pork chops

Pork chops are my friend and foe. It is so easy to over cook them, yet under cooking is just plain unappealing. The perfect balance is of the pink just recently disappearing and the chops beginning to firm up is ideal, but sometimes hard to accomplish. My solution in most cases is to smother them. It often does not matter what is used to smother, just have something to go with the chops is the goal. Sometimes I use some homemade applesauce (try it, I promise you will like applesauce and pork), other times it may be a smoky, spicy chipotle sauce. This time, I used onions and mushrooms. The good thing about this combination is that Big D and I love them. The bad news is that Little B and Tall P are not so fond of onions and mushrooms, putting them at risk of having plain chops. I considered this predicament before I started cooking, thus, the limy marinade. I served them up with some roasted asparagus and corn on the cob to make a nice, bright spring dish. The chops worked well without the smother too, especially when sliced thin for Little B, after she inhaled the corn. Tall P ate all the leftover chops the next day, so all was well in our land.

Smothered Pork Chops

9 – 10 boneless pork chops, ½ – 1” thick

3 cloves garlic, crushed

1 Tbsp dried thyme leaves

2 tsp onion powder

½ tsp chili powder

1 tsp sea salt

½ tsp ground black pepper

¼ cup lime juice

2 Tbsp extra virgin olive oil

1 medium yellow onion, sliced into thin rings

8 ounces white button mushrooms, sliced thin

½ cup water

Salt and Pepper to taste

1 Tbsp butter

In a resealable bag combine garlic, thyme, onion powder, chili powder, salt, black pepper, lime juice and olive oil. Smoosh it around until the marinade ingredients are mixed up. Add the pork chops. Seal the bag, letting out as much air as possible. Spread out the chops in the bag until they are all one layer and thoroughly coated by the marinade. Let sit for at least 30 minutes, turning over at least once. While the chops marinate make the smother. In a dry medium saute pan over medium high heat add the onions. Toss sparingly until they begin to sweat and brown/caramelize, about five minutes. When there is some caramelizing on the bottom of the pan add ¼ cup of water. Scrape the bottom of the pan and stir until the caramelizing dilutes in the water and begins to make a sauce. It will all turn a golden brown. Continue cooking over medium high heat until the liquid mostly evaporates, probably another five minutes or so. When most of the liquid has evaporated and there is more caramelizing on the bottom of the pan, add the remaining ¼ cup of water, scrape the bottom of the pan and continue cooking until the sauce begins to evaporate again. Add the mushrooms and a little salt and pepper. When the mushrooms begin to sweat and soften, turn the heat down and let simmer until the sauce is reduced by half. Add the butter and stir until it is completely melted. Set aside and keep warm for serving. Remove pork chops from the marinade and gently pat dry to remove some of the marinade liquid. In a large dry frying pan over high heat add the chops and cook on each side for about a minute to sear. If there is extra liquid it may take a few minutes longer. When both sides are browned cover the pan and reduce heat. The pork chops will release more liquid and keep them moist while the pork cooks completely. When the pork is well done (about 165-170F), turn off heat and keep warm until time to serve. To serve, place a pork chop on the plate, drizzle a little juice from the bottom of the pan over the chop, then top with the onion and mushroom mixture. Serve immediately.


Corn on the Cob


corn on the cobMy beautiful Aunt Pilar taught me how to cook corn like this. It always turned out slightly crunchy and tender, just the way I like it. I don’t eat it much anymore, since it is not one of the lower carbohydrate vegetables in in the world. Little B and Tall P like it a lot, so I do cook up a batch for them every now and then. The peak of the corn growing season is still a few months off, but warmer weather reminds me of piles of corn on the cob at group picnics and barbeques. I remember growing up my parents had a set of narrow, teak corn on the cob bowls with matching handles for the cobs. You stuck the handles on the ends, which made for dainty corn eating. The bowls allowed the melted butter that dripped off to be caught, instead of spreading all over your plate,because there was always a part of the cob that needed more butter. If you have a big crowd to feed there is a mass production version of this technique that works great. See below for the details. You may not have enough corn bowls for them, but the corn will be good and warm all the same.

Corn on the Cob

3 – 4 quarts water

5 – 8 cobs of corn

1 Tbsp sea salt

Remove the husks and corn silk from all the ears of corn. Cut short any stems that are more than ½ inch long. Pour water and salt into a deep stock pot. Cover. Turn heat to high and bring to a boil. Uncover and add corn. Cover. Cook for 8 – 10 minutes. Remove corn from water and let sit so water can evaporate and drain off, then serve immediately. Season with salt, pepper, butter or other seasonings of your choice.

If you are serving a big group outside and have to spare a large cooler with a draining spout, here is a simple approach. Put the shucked cobs in the cooler. Get all your large pots on the stove and fill them with salted water. Boil the water. Pour the boiling water over the corn, enough to cover all the ears, and close the lid. Let sit for about 15 – 20 minutes to allow all the corn to cook, then drain the water from the cooler spout. Leave the top closed so as to keep the corn warm until time to serve. Everyone will have warm corn on the cob to go with whatever is being grilled.


Strawberry Cupcakes with Strawberry Frosting

strawberry cupcakes frosted small

These little cakes came out beautifully imperfect. And Little B frosted every single one of them. We were long overdue making a batch of cupcakes, so I started by asking her what flavor she wanted. Strawberry. Then, I asked her what kind of frosting she wanted. Strawberry. I followed up by asking what she wanted to put on top. Strawberries. I saw a theme. So, guess what we got at the store? You guessed it! Strawberries. She loves pushing buttons on the blender and watching all the ingredients swirl and twirl around. The frosting is very similar to what I put on the birthday cake I made a while back, but without the icky whipped topping. Fortunately, after her taste testing between the frosting of each cupcake, there was still enough to finish the job. We got so involved with making sure there was strawberry in the cupcakes we forgot to keep some for on top! Oh well. And Tall P really liked them too! This is actually a big deal, because he claims to not like sweets. Yep. The guy who drinks sweet tea and eats box after box of fresh strawberries coated in sugar. He does not like sweet stuff. I don’t quite understand where his line between sweet and not are actually drawn. I think he has taste bud issues. Regardless, he ate up these little guys! Score one for me and Little B! They definitely taste like strawberry. Just a little nudge of sweetener made them sweet treats and the berry flavor really shines. They taste like summer.

Strawberry Cupcakes with Strawberry Frosting

Cakes

1 pound strawberries, cored

1 Tbsp lime juice

1 tsp pure stevia powder

6 eggs

1 Tbsp vanilla

¾ cup coconut flour

¼ cup golden flax seed meal

1 Tbsp baking powder

½ tsp sea salt

Strawberry Cream Cheese Frosting

8 ounces cream cheese, room temperature

½ cup salted butter, room temperature

½ cup granulated Splenda

2 Tbsp sugar free strawberry syrup

Preheat oven to 350 degrees. In a blender or food processor add the strawberries and lime juice. Blend until there are no large strawberries remaining. Add the Stevia powder and eggs. Blend again until combined. In a separate bowl combine the coconut flour, meal, baking powder and salt. Add the dry ingredients to the wet ingredients and blend some more until combined. Let the batter sit for a few minutes – you will notice it thicken a bit. Pour batter into 24 lined regular sized muffin tins (or 12 regular muffin tins and 24 mini muffin tins). Bake for 20-25 minutes until set and browning. While the cupcakes are baking prepare the frosting. In a medium bowl combine the the cream cheese, butter and Splenda. In a small bowl combine the arrowroot powder and strawberry syrup. Mix until smooth and thick. Stir the syrup mixture with the cream cheese mixture until the color is evenly distributed. When cupcakes are cooled frost them. Store in the refrigerator.

Tart Apple Sauce

tart apple sauce

If your local grocer is anything like mine, they have a corner of the produce section where you can occasionally find deeply discounted fruits and vegetables that are gently bruised or pretty ripe. Recently there was a bunch of Granny Smith apples marked down to 50 cents a pound. What a steal! I had to grab some. They are my favorite apples ever – green and crisp and tart. Making apple sauce with them results in a nice tart sauce as well. I think it tastes much better than the sweeter stuff from the store. I don’t add any sweetener or sugar – I don’t think the sauce, or Little B, needs it, but could easily be added if you prefer. I threw it all in the crock pot at bedtime and the house slowly started smelling like apples and cinnamon during the night, making me seriously crave an apple fritter for breakfast. A spoonful or two of the apple sauce took care of that, thank goodness. I have made this stuff for Little B ever since she started eating solids. She still likes it and happily inhaled a bowl full as soon as the stick blender was pulled out.

Tart Apple Sauce

6 – 8 large Granny Smith apples
1 Tbsp ground cinnamon
1 cup water

Core and slice apples, leaving the skin on. The skin will soften and cook down, so you won’t notice it in the final product. The sauce will be darker than what you typically buy at the store, but the texture is the same. Place apples in a crock pot. Add cinnamon and toss to coat apple slices. Pour water over apples, cover and set temperature to low. Cook for 6 – 8 hours. Let cool and puree with a hand mixer until smooth. Store in the refrigerator or freezer.

Cornless Corndogs

cornless corndogs

These are sooooo easy! Whip up a batch of coconut flour ‘cornbread’, impale the cornbread muffins with pieces of hotdog and pop them in the oven. Little B really loves corndogs, but I don’t like giving her the funky ones found in the freezer section of the store or deep fried versions at fast food restaurants. I’m not saying that when I am surrounded by a carnival, and there is a severe lack of protein or low sugar options I am going to deprive her of one. I am just saying that when I have an opportunity to give her (and myself) a more nutritious version, I am going to take it. Regardless of how nutritious I try to go, they are still hotdogs. I do try to stick with Hebrew National or uncured versions, but it is still macerated meat. Oh well. Nothing is perfect. Some day I may even figure out how to make these on a stick, but for now, they are delectable muffins. They are baked, portable picnic fare that I personally dip in yellow mustard. Living on the edge. That’s me.

Cornless Cordogs

1 batch cornless cornbread
6 hotdogs

Preheat oven to 400 degrees. Make a batch of cornless cornbread batter. Divide it equally in a 12-count muffin tin. Cut each hot dog into four pieces. Stick two pieces of hotdog in each muffin, trying to keep them away from the edges. Bake for approximately 15 minutes, until the batter is cooked and the hotdog pieces are roasted. Let cool before removing from pan. Serve immediately with mustard.

Post Navigation