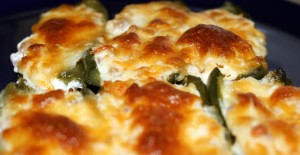
Texan Macaroni and Cheese
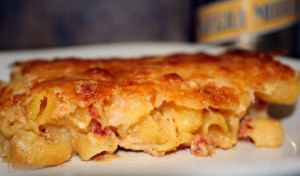
I am evil. Really evil. I had a craving for one of my dishes of yore and just had to make it. I include here the evil and less evil versions of the recipe. A few years ago I had this idea to play around with food and enter cooking contests. The hankering did not last long and I never won anything, but experimenting with one particular dish holds some sweet memories for me. I have always liked macaroni and cheese, but am often disappointed in the lack Of flavor in some versions. I like sharp cheeses and some punch in the flavors soaked up by the pasta. Growing up we would have the Kraft version on Fridays in lent. It did not feel like much of the meatless sacrifice it may have been intended, although it was a variation on the protein rich meals we usually ate. When I decided to join a macaroni and cheese recipe contest I was determined to have it taste the way I loved. At the time my brother and I happened to be visiting my parents. We spent a crazy late night making at least three batches of the stuff, working to make sure the cheese sauce was smooth and the final baked results were not dry, but also not runny. We had a lot of fun, caught up on each others lives and finished off the leftover beer, among other things. I don’t get to spend much time with my brother these days, so it was a treat to share the kitchen with him. It was a marathon cooking and picture fest, which I hope did not keep our mom up too late. She probably enjoyed lying awake laughing at our conversations. I never asked. Here is the original, non-award winning recipe and a lower carbohydrate, wheat free version. They both work, but the non-wheat pasta version results in an extra nutty flavor from the quinoa, I think. Overall, the combined flavors of Mexican beer, cheese and the tomato/chilies remind me of the south Texas foods I grew up with. Totally appeased my comfort food hankerings and brought back great memories.
Texan Macaroni and Cheese
Wheat Version
1 pound elbow pasta
1 can tomatoes and green chilies
1 1/2 lb Sharp or Medium Cheddar Cheese, grated
5 oz goat cheese
12 oz Mexican beer (suggest Negro Modelo)
1 can condensed cream of celery soup
2 tsp ground cumin
½ tsp sea salt
1/2 cup heavy cream
2 large eggs
1 Tbsp butter (for baking dish)
1/2 lb Monterrey Jack Cheese, grated
1 tsp paprika
1/2 cup crushed tortilla chips (optional)
Cook pasta per package instructions for al dente and rinse with cold water. Drain well. Heat medium pot over medium-high heat. Add tomatoes and chilies, beer, goat cheese, cream of celery soup, salt and cumin. Stir until blended and heated through. Turn heat to medium-low. Gradually add Cheddar cheese, stirring occasionally until cheese is melted. Remove pot from heat. Preheat oven to 350 degrees Fahrenheit. Add pasta to cheese mixture and combine until pasta is well coated. In separate bowl mix together cream and eggs until eggs are well beaten. Gradually fold cream/egg mixture into pasta until thoroughly combined. Butter 9 x 13 baking dish. Pour pasta mixture into dish. Bake uncovered for 20 minutes in preheated oven. Remove dish from oven and sprinkle Monterrey Jack cheese over pasta, followed by sprinkling paprika, then tortilla chips (optional). Bake for an additional 18 – 20 minutes until the top cheese is bubbly and browning. Remove from oven and let rest for ten minutes before serving.
Non Wheat Version
1 pound wheat free elbow pasta (suggest quinoa version)
1 can tomatoes and green chilies
1 1/2 pounds Sharp or Medium Cheddar Cheese, grated
5 oz goat cheese
12 oz Mexican beer (suggest Negro Modelo)
¾ cups heavy cream
½ cup chicken or vegetable broth
1 Tbsp arrowroot flour
2 Tbsp butter
1 tsp salt
¼ tsp pepper
2 tsp ground cumin
1/2 cup heavy cream
2 large eggs
1 Tbsp butter (for baking dish)
1/2 lb Monterrey Jack Cheese, grated
1 tsp paprika
The instructions of the recipe are the same except for one extra step. There are ingredients substituting the cream of celery soup that need to be added when the sauce is hot. Before turning off the heat and adding cheddar cheese to the sauce, add ¾ cup cream, broth, butter, arrowroot flour, salt and pepper. Using a whisk stir until the sauce is smooth. Continue with the recipe directions.