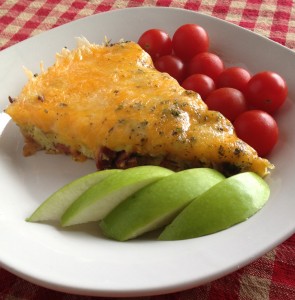
Any Kitchen Will Do

Give me a kitchen and I will cook.

Archive for the month “December, 2012”

Meaty Fritatta

meaty frittata

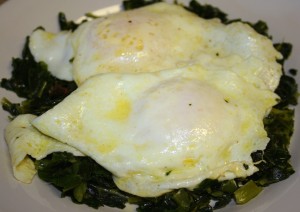
Yep. We are on a run of two meals a day. Not because we are watching calories or anything, but because we are having big holiday lunches or dinners, or leftovers of big holiday lunches or dinners, so any other meals are simple and small. For example, we have quick plates of eggs and greens, or a plate of antipasto because of a big meal happening later. Here is a meal that can use leftover meats and will keep you filled until “the” big meal later. A fritatta is easy to put together while also giving you (aka, me) a few minutes sit and sip some coffee while it cooks, but before digging in. Besides the holiday balancing of big meals, this is something we have on weekend mornings when we are not exactly sure what to do for the day. It is a great time to sit and ponder what we are going to discover in the world with Little B. The awesome part these days is that Little B is very vocal about what she wants to do, and not do, so having a conversation with her about our activities while brunch cooks is pretty darned cool.

Meaty Veggie Fritatta

2 Tbsp extra virgin olive oil
4 cloves garlic, chopped
½ sweet onion, finely chopped
8 ounces sausage, roughly chopped
8 ounces ham or bacon, roughly chopped
1 cup broccoli, finely chopped
8 eggs
¼ cup fresh basil, chopped
1 Tbsp dried oregano
1 tsp dried parsley
½ tsp ground cumin
½ tsp sea salt
¼ tsp ground black pepper
2 cups shredded cheese, a combination of cheddar, colby jack, monterrey and pepper jack

In large frying pan add oil over medium heat. When oil is hot add garlic and onion. Cook until they begin to brown. Add sausage, ham and broccoli. Toss and cook until broccoli begins to wilt. In medium bowl while meat is cooking add eggs, basil, oregano, parsley, cumin, salt and pepper. Whip until eggs yolks and whites are combined and spices are mixed up. When meat is ready add eggs and stir until meat mixture and eggs are combined. Turn heat down as low as possible and sprinkle cheese on top. Cover pan and cook for ten to fifteen minutes, until eggs are set and cheese is melted all the way to the middle. Remove from heat and leave covered for about ten minutes. Uncover and slice into wedges. Serve with fresh fruits and vegetables.

Eggs and Greens

eggs and greens

After all the effort put in to making holiday lunches and dinners, the last thing I want to do after a late or particularly celebratory evening (aka, one too many glasses of champagne), is make a big, fancy breakfast. To fill the tummy and make the breakfast last until said lunches or dinners, try some eggs and greens! The combination of protein and fiber will fill up your tummy and won’t take very long to throw together. You can always use fresh greens, but more cooking may be needed. We like keeping frozen greens in the freezer that were previously blanched, so a quick saute will make instant, hot veggies for us. We always, always have eggs around, so the combination is a no brainer. I like my eggs cooked medium so there is some firm parts to munch with the egg whites, while the runny part mixes up with the greens. Occasionally I will throw some leftover meat in with the greens if we are realllllly hungry, but it is not necessary to fill right up. Leftover ham could, potentially, result in a type of green eggs in ham, without the freakishly green food coloring added to the eggs. Yes, I have done such a thing to poor eggs, and they taste great if you close your eyes. Heh. If Little B is in a -particular- mood I may have to scramble instead of fry an egg for her, but she likes the greens regardless! Yay!

Eggs on Greens

3 Tbsp butter, salted
2 cloves garlic, crushed
4 cups frozen collard greens, chopped
4 – 6 eggs
Salt and Pepper to taste

In a saute pan over medium high heat add 1 Tbsp butter. When butter is melted add garlic and toss until garlic sweats. Add greens and toss until wilted and heated through, about five minutes. Sprinkle with salt and pepper to taste and toss. Remove from heat, cover and set aside. The greens will continue to soften and keep warm, but not lose much more in the way of nutritional benefit. In another pan add 2 Tbsp butter over medium heat. When butter is melted crack all four eggs into the pan. Fiddle with the edges of the eggs so they don’t become one big four-eyed egg. Sprinkle with just a bit of salt. At this point you have two choices – flip or cover. After just enough time to let the eggs set, turn down the heat to low. You can either: 1) flip each egg separately and cook for another minute, or 2) if you don’t like flipping, just cover the pan for a minute or so, allowing the top of the eggs to set. Either way, poke the yolks gently to monitor speed of cooking, until they are cooked to desired doneness – soft, medium or hard. It is not my fault if you over poke and puncture the yolk, but how else will you determine how done it is? To plate, put a half the greens on a plate and flatten them a bit, then add two eggs. Serve and consume immediately.

Dragon Fruit Frenzy

dragon fruit salad

Dragon Fruit is the funkiest fruit I know. It is bright and crazy on the outside and and a neutral black, white and mild on the inside. It kinda tastes like kiwi fruit, but unlike the skin of the kiwi, you should shy away from eating the thick pink skin of the dragon fruit. With the single dragon fruit I got from the market I made two simple recipes – a fruit salad for Little B and a rather odd looking cocktail for myself. The meat of the dragon fruit can be sliced or cubed and looks really pretty with brightly colored fruit – in this case, strawberries. dragon fruit margaritaFor my cocktail I did a margarita-type drink (I know, blasphemy for the margarita purist), and sipped it while having a nice green salad with shrimp. The whole meal felt kind of summery, which felt odd, since it is December, but very refreshing after some of the heavier foods we are eating lately. With my eyes closed the cocktail was soft and lovely. With my eyes open it looked like a gray sludge that tasted soft and lovely. I don’t know what to do about the color, but it tastes wonderful.

Dragon Fruit Frenzy

Strawberry Dragon Fruit Salad

½ dragon fruit, meat only, cubed
¾ cup strawberries, chopped
1 Tbsp lime juice

Combine dragon fruit cubes and strawberries. Drizzle juice over fruit and gently toss. Serve immediately or chill before serving.

Dragon Fruit Cocktail

½ dragon fruit, meat only
¼ – 1/3 cup tequila
½ lime, juiced
1 – 2 tsp truvia
6 cubes ice

Add 1 tsp truvia and remaining ingredients to blender. Blend on high until ice is broken up. The sweetness of the fruit can vary, so taste the cocktail and add more truvia to preferred sweetness. Serve immediately.

Cinnamon Dough Ornaments

cin ornaments

I guess technically you can eat these ornaments, and they get made in the kitchen, so they pass the ‘food blog’ test I arbitrarily created in my head. If you don’t eat them, which I advise, they can make any space they occupy smell WONDERFUL! For days after making these ornaments with Little B the house smelled of cinnamon, then when the ornaments got put on the Christmas/Solstice tree they still smelled wonderful. One of them hanging in my office gets rid of that officy smell, which is not that bad, but nothing compared to cinnamon spice. There is still time before the holidays are over to add some decorations, so dive in and make a batch. Our first roll out was with dough that was too sticky, so the intended shapes got, well, a bit reshaped when transferring them to the pan. They also  cracked a bit when baked. We learned as we went, though, and stiffened the dough up with more cinnamon. The picture shows our mixed results, and you can tell which ones were made with the wet dough compared to the dryer dough. This project appeased my desire to make cut out cookies, didn’t result in sugarbombs sitting around the house begging to be eaten. It was such fun creating glittery ornaments we can enjoy during the holiday season. Stay tuned for a wheat free edible version of cut out cookies, but experiments in that vein continue, and mastery is still pending….

Cinnamon Spice Dough Ornaments

1 ½ – 2 cups ground cinnamon
1 tsp ground clove (optional)
1 cup applesauce
1 Tbsp glitter (optional)

Combine half the ground cinnamon, the ground clove (it will make the dough darker, so decide before adding if you want darker or lighter results), applesauce and glitter. Combine until a dough forms. Add more cinnamon as needed to thicken if it is too sticky. The amount of cinnamon needed varies with altitude and humidity, so keep adding cinnamon until the dough seems crumbly, and you need to knead it for the pieces to stay together. Wet dough will bake brittle and the ornaments will crack, so make sure it is stiff. Roll out the dough and use cookie cutters to shape the ornaments, or cut them out freehand. Use a drinking straw to poke a hole in the ornament, strategically placed, for hanging. Place ornaments on baking sheets covered in parchment paper, or directly on the sheets. Bake ornaments at 200 degrees for two hours, then turn off oven and leave the oven closed until it cools off. Yes, I know you can’t tell if the oven is cooled off unless you open it, but two more hours or overnight should do it. Carefully remove the ornaments from the sheets/paper. Loop string or cord through the hanging holes and decorate something.

Cranberry Roasted Chestnut Muffins

After you do some holiday baking and roast chestnuts on an open fire, you want to do more! We set aside some chestnuts from our recent roasting adventure so I could make these muffins. A recipe for my extra special secret cornbread dressing includes the wonderful inventions of roasted chestnuts and fresh cranberries. I have yet to convince myself to share the recipe, especially since I have not made it in a while, but did recently have a hankering for the flavors that make up the dressing. The evils of corn (it is not the fault of the natural corn, but the sugary nature of the vegetable, which is why I avoid it) have discouraged me from making the dressing in recent years. To recreate the flavor and texture in a corn free way I came up with these muffins. The flax seed gives them the texture that hints at cornbread (and adds extra fiber), while dancing well with the cranberries and chestnuts. Muffins continue to give Little B a sweet treat while keeping her diet high in fiber and low in sugar. She still gets a little confused sometimes when she can have muffins at home and not when we are out, but I have taken to having muffin back ups in my purse for such occasions. She helps make the muffins pretty much every time, which helps keep her interest, and they sate her desire for baked goods. So good so far!!

Cranberry Muffins with Roasted Chestnuts

6 eggs
6 Tbsp butter, melted
4 Tbsp heavy cream or half and half
1 tsp vanilla3 drops liquid stevia
½ tsp sea salt
½ cup coconut flour
¼ cup flaxseed meal
¼ cup powdered erythritol
½ tsp baking powder
8 ounces fresh cranberries
4 roasted chestnuts (can substitute with 10 raw pecan or walnut halves)

Preheat oven to 400 degrees. Prepare muffin pan with liners. In blender add wet ingredients, nuts and cranberries together. Blend on low until cranberries and nuts are broken up in small pieces. In separate bowl combine dry ingredients. Add wet ingredients to dry ingredients and stir just until combined. Divide batter among the 12 muffin cups. Bake for about 15 minutes until tops begin to brown. Let cool for about ten minutes before serving.

Peppermint Bark

I did it again. Had a hankering to make something sweet, delicious and addictive, only to then take it to work and encourage bad habits for my co-workers. There are fancier versions of peppermint bark out there, but I have found this one to be consistent and delish. It can be doubled, tripled, taken to a potluck or divvied among gifts for teachers or neighbors. I warn you to not make it just because you want some. If you are anything like me you will have ‘just a bite or two’ so many times it will suddenly be gone and you are the sole culprit. Either have plans to share it or go ahead and get elastic waist pants. Another warning: don’t confuse peppermint extract and oil – the oil is much more potent than extract, and the results will vary widely, sometimes in a bad way. Yet another suggestion: if you have an energetic young person who wants to help make the bark, hand them the bag of canes and let them whack it on the ground. It will probably do the trick. Happy Holidays!

Peppermint Bark

2 pounds white chocolate chips or roughly chopped white chocolate bark
1 package (about 12) peppermint candy canes
½ tsp peppermint extract or 2-3 drops peppermint oil

Prepare medium sized cookie sheet by lining with parchment or wax paper. Crush candy canes: place unwrapped canes in a resealable bag, then use a rolling pin or tenderizer hammer to break them up, making sure all pieces are less than 1 centimeter long. Set aside candy. Into a medium glass bowl add chocolate. Melt in microwave for one minute. Stir. Continue heating in microwave by using 30-second increments, stirring after each increment. You can also melt the chocolate in a metal bowl over a double boiler with gently simmering water. When the chocolate is warm, smooth and completely melted, add extract or oil and stir well. Pour chocolate onto prepared pan and spread until chocolate is evenly distributed. Sprinkle crushed candy over top and gently press it into the chocolate. Let cool completely at room temperature or in the refrigerator, then break into desired serving sizes – I usually make 2-inch square-ish pieces. Store in air tight container.

Roasted Chestnuts

Chestnuts roasting on an open fire….the opening to one of the most wonderful winter songs ever. So many times in recent years I was actually unable to find fresh chestnuts! This year I found some at the store and snagged a bag. While my wonderful MIL Sherry and forever BFF Kelley were here for a visit we were able to fulfill the cliché.

The coals were still glowing red after Big D seared steaks and we had a red meat feast. We had a blast roasting them, and after they cooled just enough we were able to peel them. We could tell they were done when the shell where they were cut started curling up and away from the nut. It was great evening and the chestnuts made for quite a treat. Sherry and Kelley had never roasted chestnuts. We flitted around the kitchen enjoying the process and savoring the flavors of the nuts. Preparation of the nuts is similar to garlic – the outer shell is removed, then the thin membrane right on the nut itself needs to be removed. As my lovely daughter concluded, they look more like brains, which are food for the zombies. Does it help that they are nested in a nice bed of young greens? Maybe not. I don’t want to know how badly we have distorted her mind, but Shaun of the Dead is a most awesome movie. Roast up some chestnuts this winter, or find a street vendor who did the work for you. It is a flavor that will linger and you will never forget.

Roasted Chestnuts

Roasting pan or grilling grid for fish
Open fire or grill with glowing embers
12 – 24 raw chestnuts

With a sharp knife make a criss-cross cut into one side of the nut shell. Roast over an open fire until the cut sections curl away from the nuts and start hissing. The nuts are a bit like popcorn – as you roast them they can go from roasted to burned in about two seconds, so watch carefully, otherwise they might burn. Remove from fire. Let cool just until they can be handled. Peel off outer shell and remove the brown membrane, until the tan colored nut is exposed. The roasted nut should be about the color of a peanut and the texture of a walnut. Eat immediately or freeze/refrigerate for use with chocolate fondue, in recipes and on salads.

Pumpkin Pie No Sugar No Wheat No Problem

A pumpkin pie with a crispy crust and moist custard, full of spices and sweet pumpkin. A quintessential dessert around my house during the holidays. We like serving it chilled, and mine is usually topped with some freshly whipped cream. I like making it first thing in the morning so the house smells wonderful all day. Little B is becoming quite a pro at stirring, so the custard was a joint effort this year. Sometimes I use fresh pumpkin, other times I resort to canned stuff. I have discovered over the years that the fresh stuff needs a little more spicing to get that just right balance of flavors in the pie. Big D likes his pumpkin pie extra spicy and wheat free, while I want it sugar free with a flaky crust. This recipe met all four requirements! My next wheat free, sugar free pie will be pecan. Stay tuned!

Pumpkin Pie No Sugar No Wheat No Problem

Crust
1 1/2 cups almond flour

1 tsp ground cinnamon
1 Tbsp splenda
4 tablespoons butter, melted

Custard

15 ounces puréed pumpkin
1 Tbsp ground cinnamon
1 tsp ground ginger
½ tsp ground cloves
¼ tsp nutmeg
½ tsp salt
¾ cup splenda
2 large eggs
1¼ cups heavy cream

Heat oven to 375ºF. For the crust, mix together the almond flour, 1 tsp splenda and butter until combined. Press mixture into an 8” or 9” pie plate and refrigerate for at least 30 minutes. In a medium bowl whisk pumpkin purée, splenda, cinnamon, ginger, cloves, and salt to combine. Mix in eggs, one at a time. Add heavy cream and mix well. Pour custard into pie crust. Cover crust edge with aluminum foil. Bake for about 40 minutes, or until filling is set but still a little jiggly in the middle. Cool on a wire rack.


Post Navigation